Deploy MOSTLY AI to an AWS EKS cluster
To run MOSTLY AI in AWS, you need to create an Elastic Kubernetes Service (EKS) cluster. MOSTLY AI provides a set of automated scripts and configuration files that can help you create and configure an EKS cluster as well as create and mount the required EFS storage, and create and configure an AWS Application Load Balancer (ALB) for the application.
This page contains step-by-step tasks that guide you through the process of deploying MOSTLY AI in an AWS EKS cluster. The tasks are grouped into the categories below.
Use the tasks on this page as a reference for what you might need to complete to reach the point in which MOSTLY AI runs in an EKS cluster.
Before you start, make sure you complete the prerequisites in the next section.
Prerequisites
- An AWS account.
- Install the tools listed below.
- Decide in which AWS region you want to deploy MOSTLY AI. The page documents the steps in detail to deploy to
eu-central-1. If you need to deploy to another region, read the information about the Region-specific EKS images and how to configure for that. - Obtain deployment details from your Customer Experience Engineer.
- MOSTLY AI Helm chart. Required for Task 13.
- First-time log in credentials for the MOSTLY AI application. Required for Task 16.
- (Optional) MOSTLY AI image repository pull secret. Required only if you intend to use the MOSTLY AI image repository to pull the container images. Optional for Task 13 and Task 14.
Pre-deployment
Task 1: Create a key pair in EC2
When you create a key pair in EC2, you can use the generated security credentials to use ssh and log in to the EC2 instances that the MOSTLY AI deployment script creates.
Prerequisites
- Log in to the AWS Management Console. You can do the steps here with your root AWS account.
- Select the zone in which you want to create your Kubernetes cluster.
Steps
-
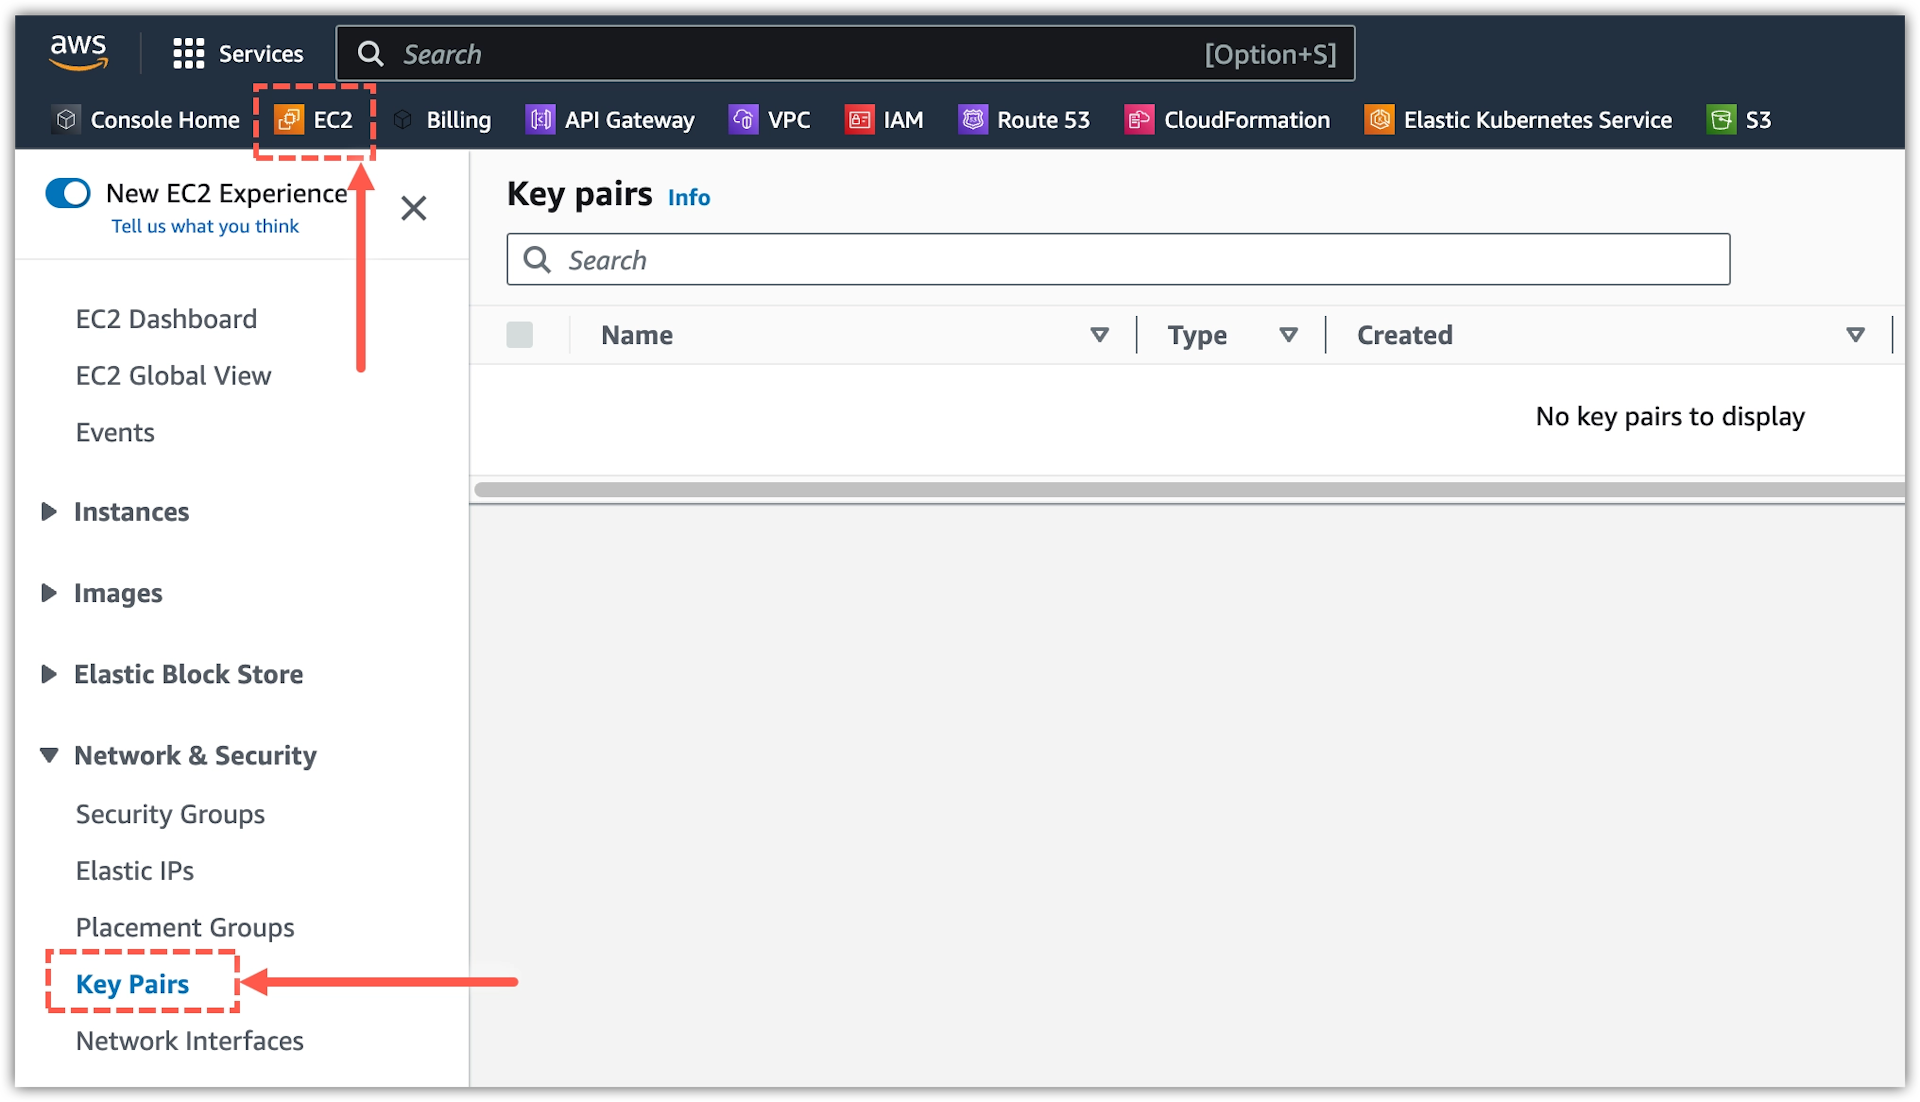
From AWS Services, search and open EC2.

-
In EC2, select Key Pairs under Network & Security from the sidebar.
-
Click Create key pair.

-
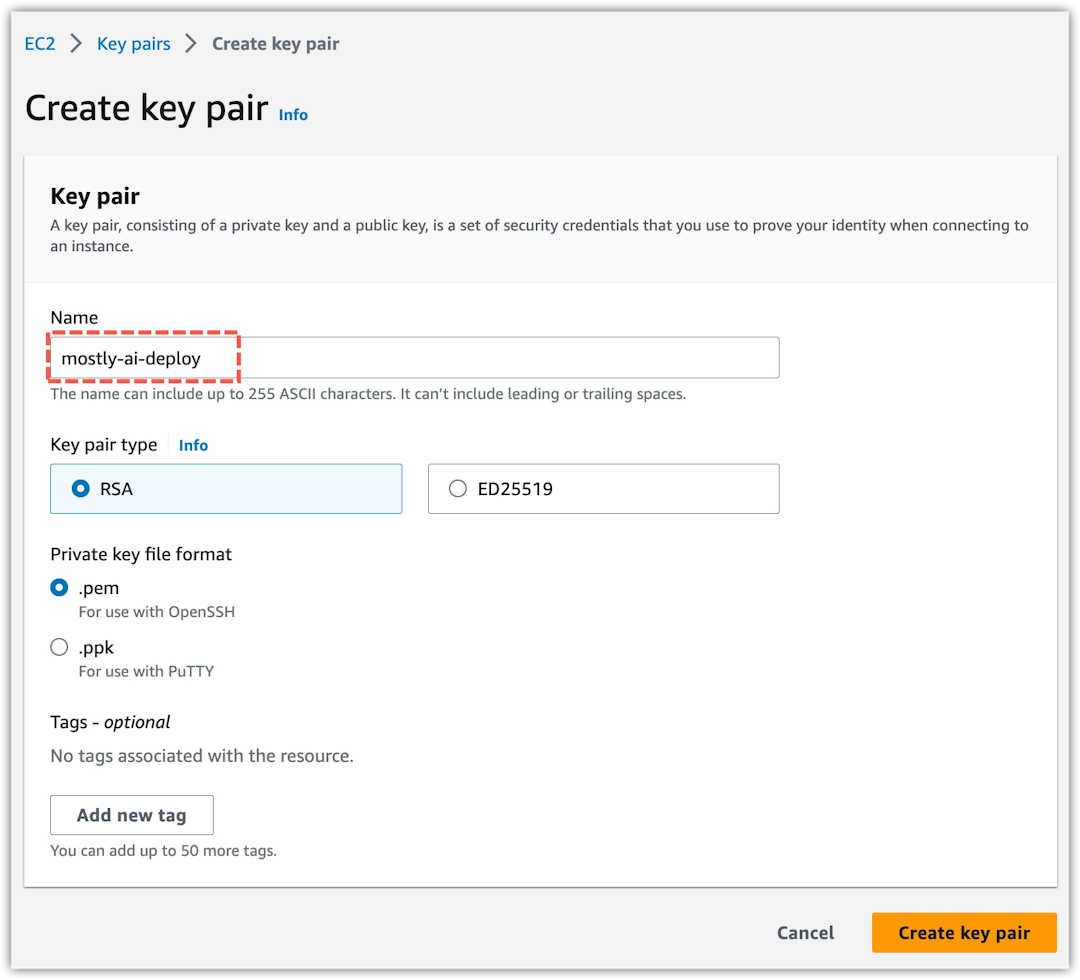
Enter a name for the new key pair and click Create key pair.
💡Leave the default options:
- Key pair type: RSA
- Private key file format:
.pem
Result
The new key pair appears in the list. The generated .pem file that contains the certificate and access keys download automatically.

What’s next
You can now create a non-ROOT user which is a requirement to run the deployment script in Task 11.
Also, later in Task 10, you define the key pair name in the eks-cluster.yaml deployment configuration file which is a requirement before you run the deployment. You can also use the downloaded certificate to log in to the Kubernetes pods that MOSTLY AI deploys.
Task 2: Create a user group
As a best practice, create a user group to which you will assign the required policies and add the user that will run the deployment script.
Steps
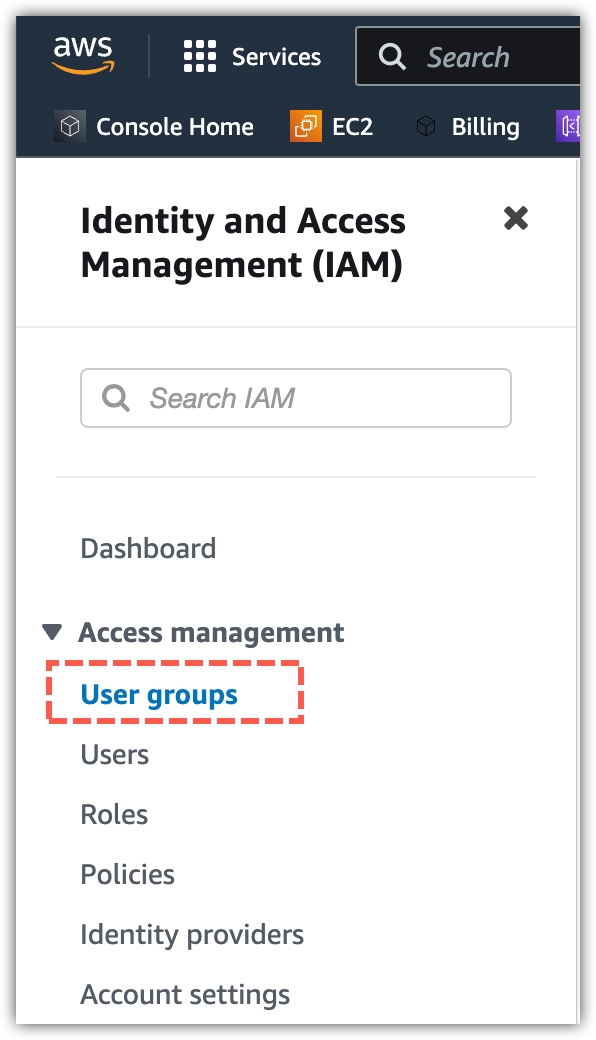
- From AWS Services, search and open Identity and Access Management (IAM).

- In IAM, select User groups from the sidebar.
- Click Create group.

- Name the group
eksctl-groupand click Create group.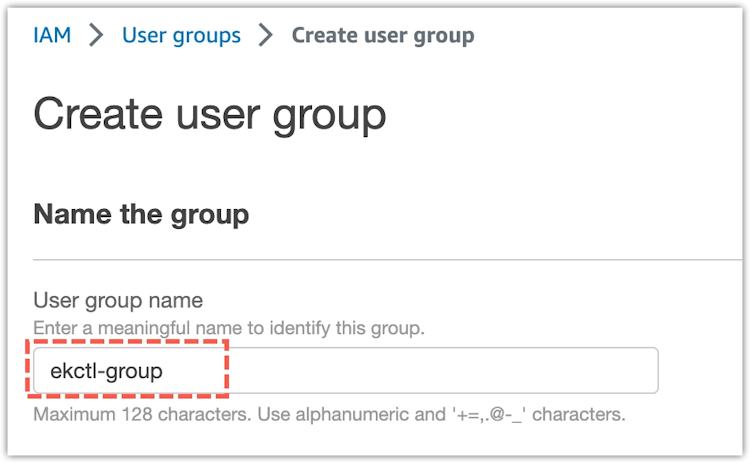
Result
The user group eksctl-group is now listed under User groups.

Task 3: Assign an administrator policy to the user group
Allow the user group to act as an administrator which will grant the user that runs the deployment script the privileges required to create an EKS cluster and all related resources.
Steps
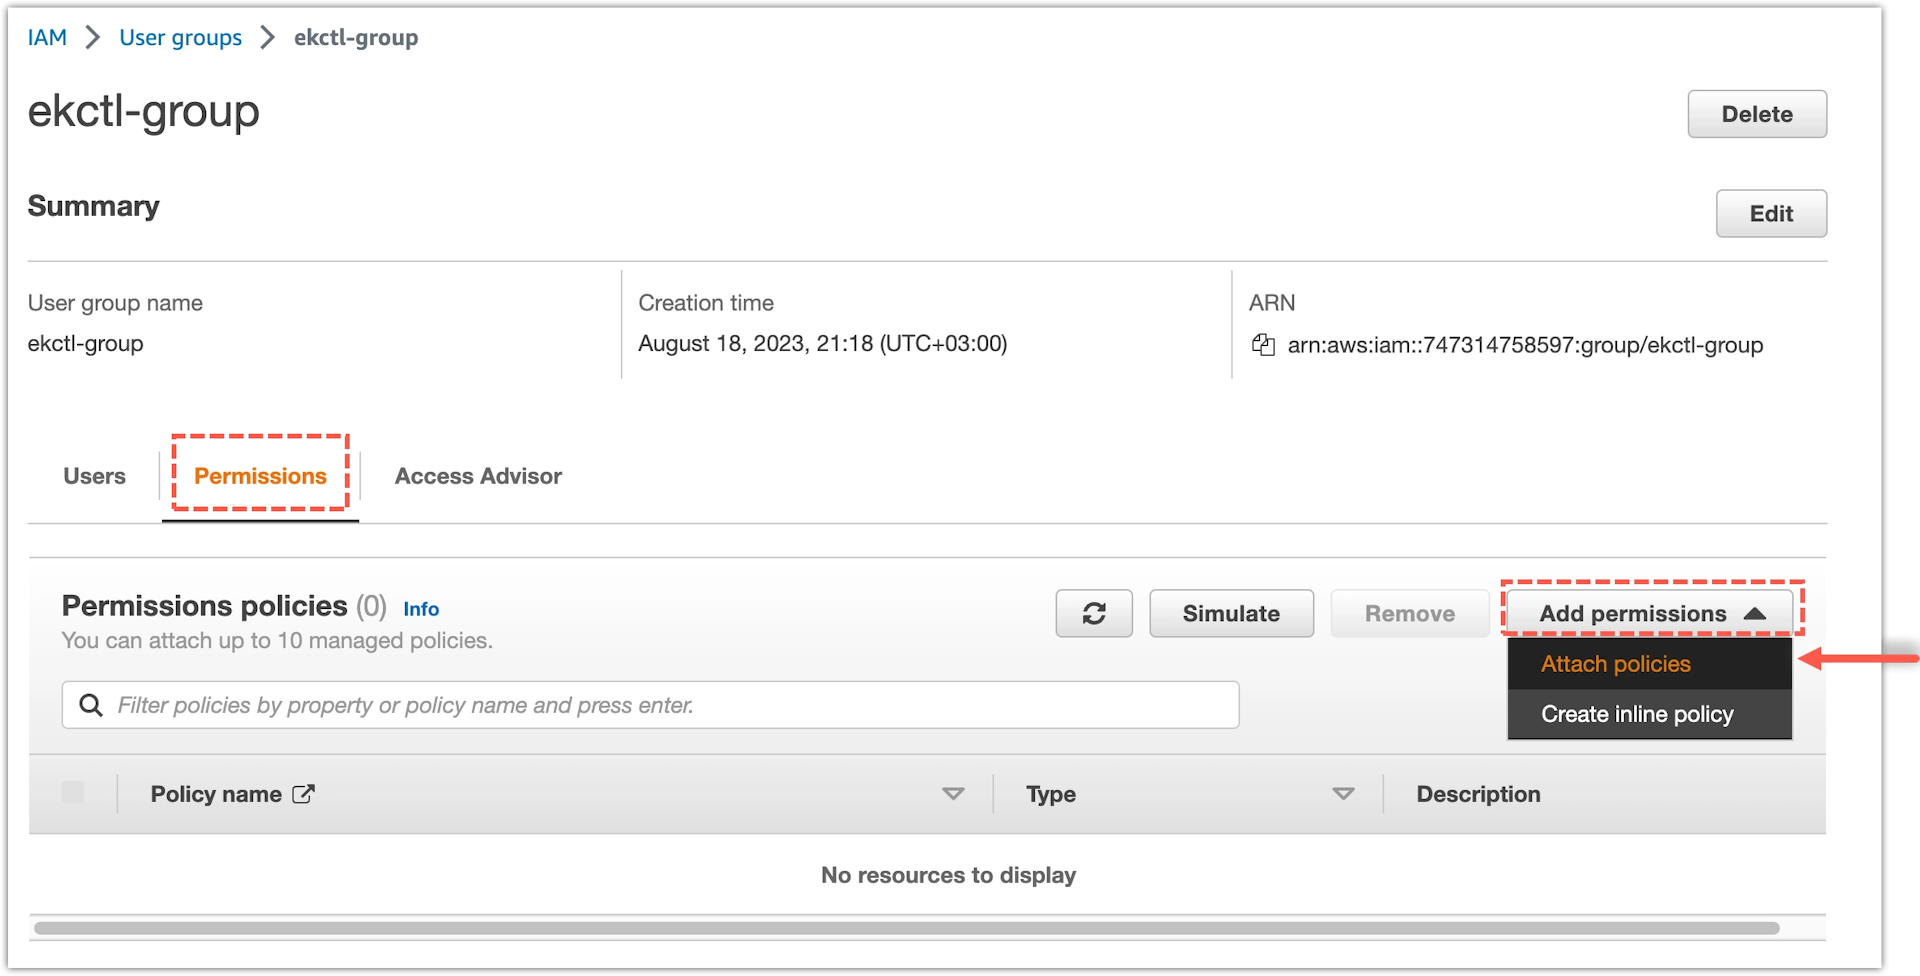
- From User groups, click the
eksctl-groupto open its settings. - Select the Permissions tab.
- Click Add permissions and select Attach policies from the drop-down menu.
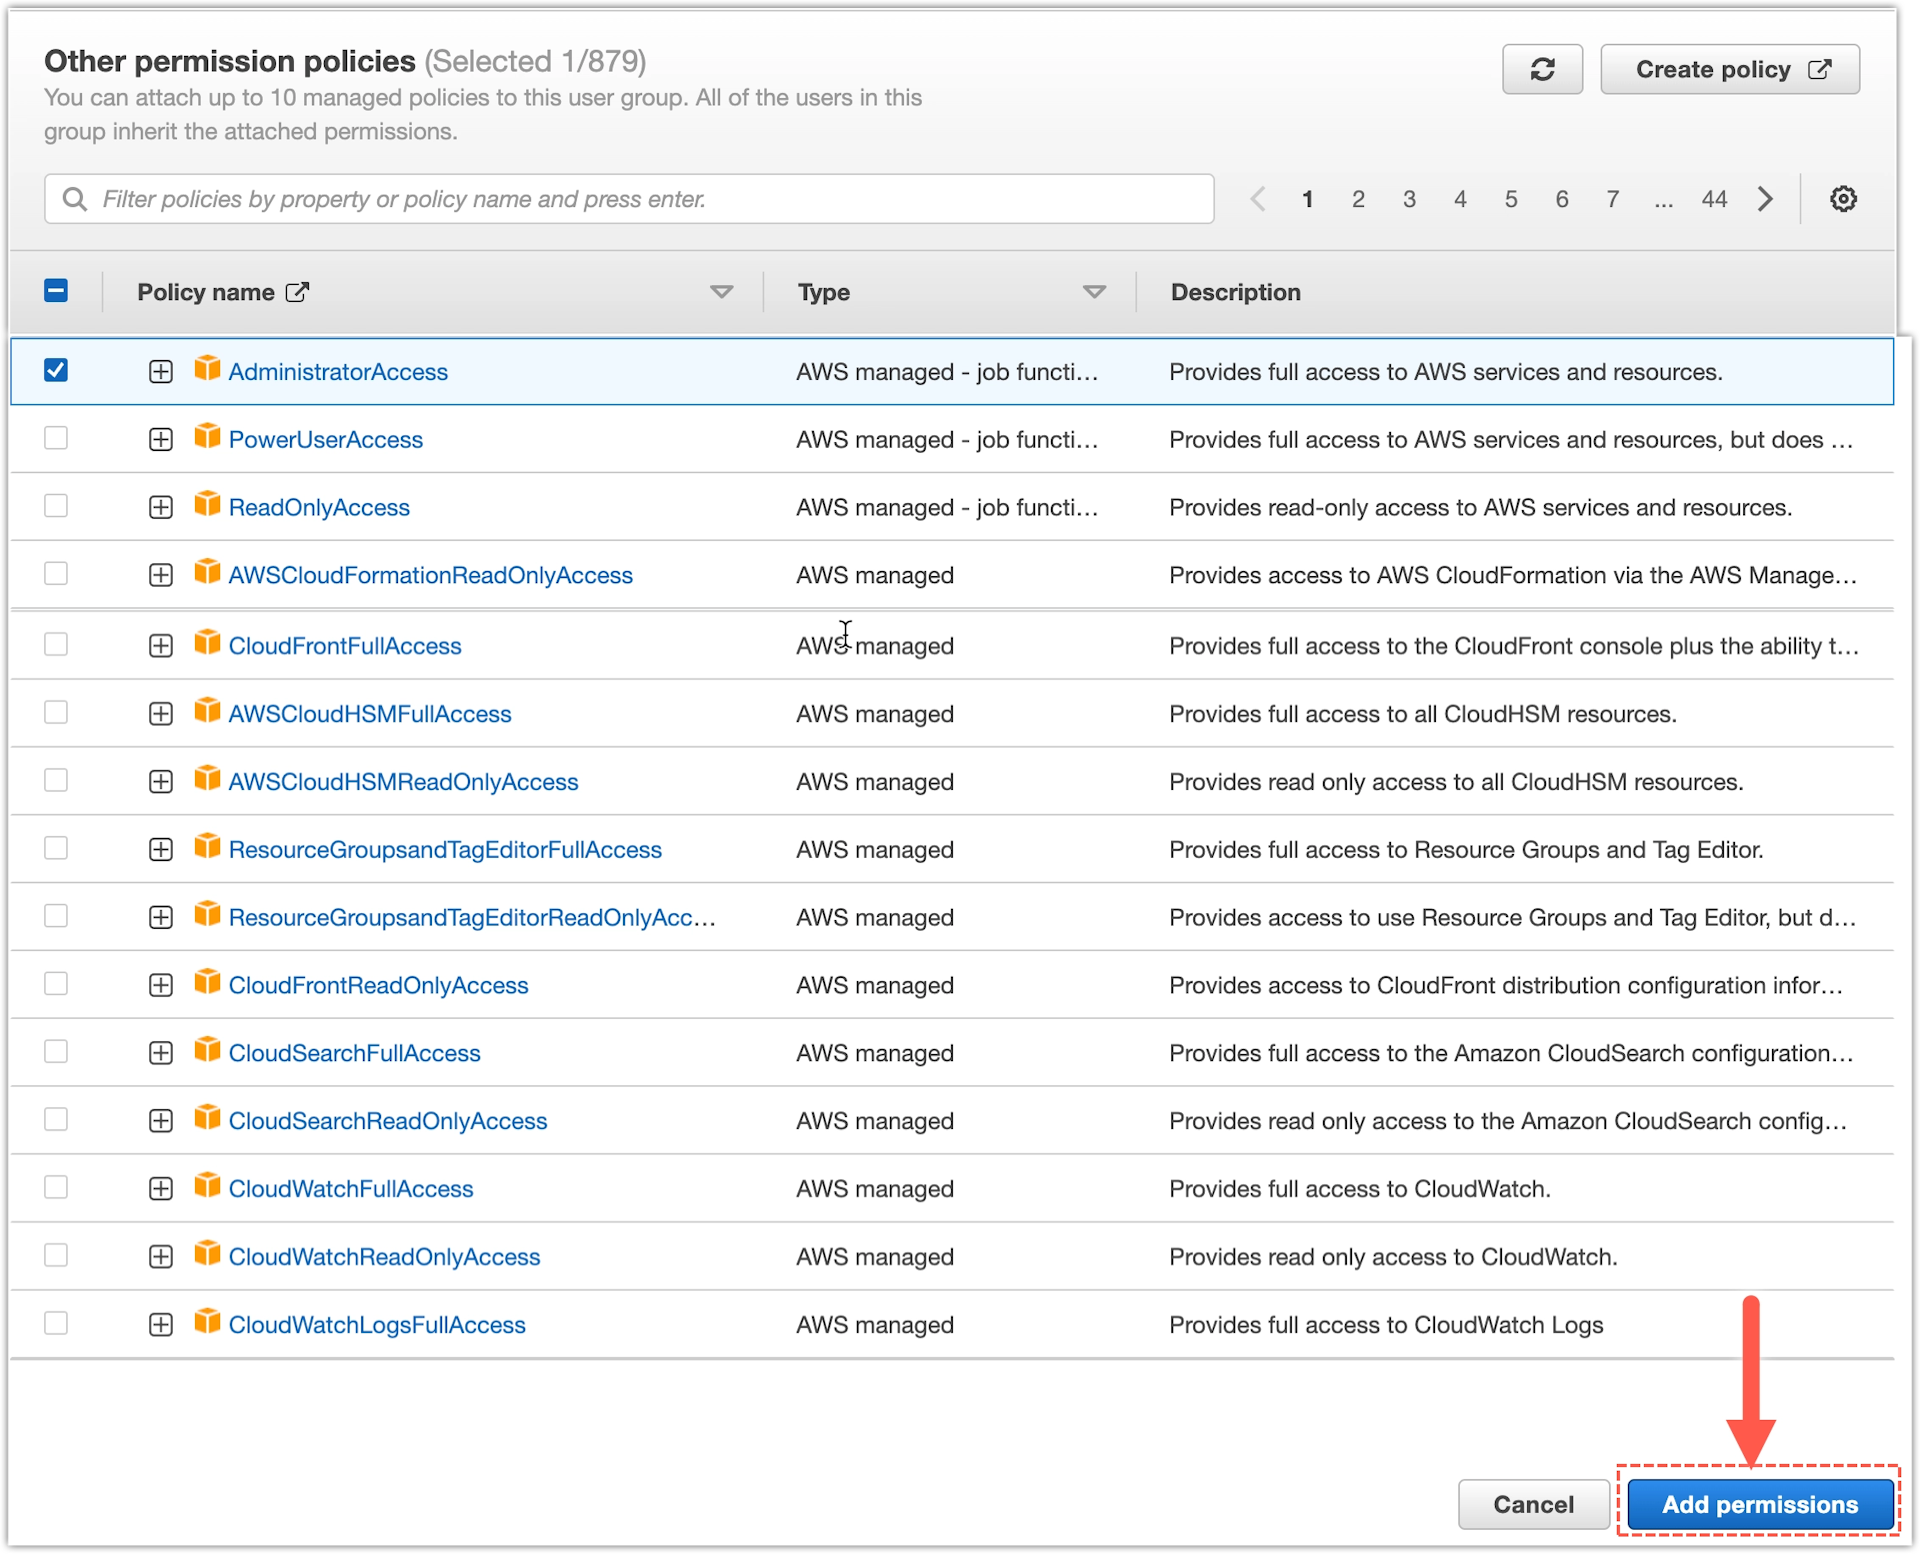
- Select the
AdministratorAccesspolicy.
- Click Add permissions.
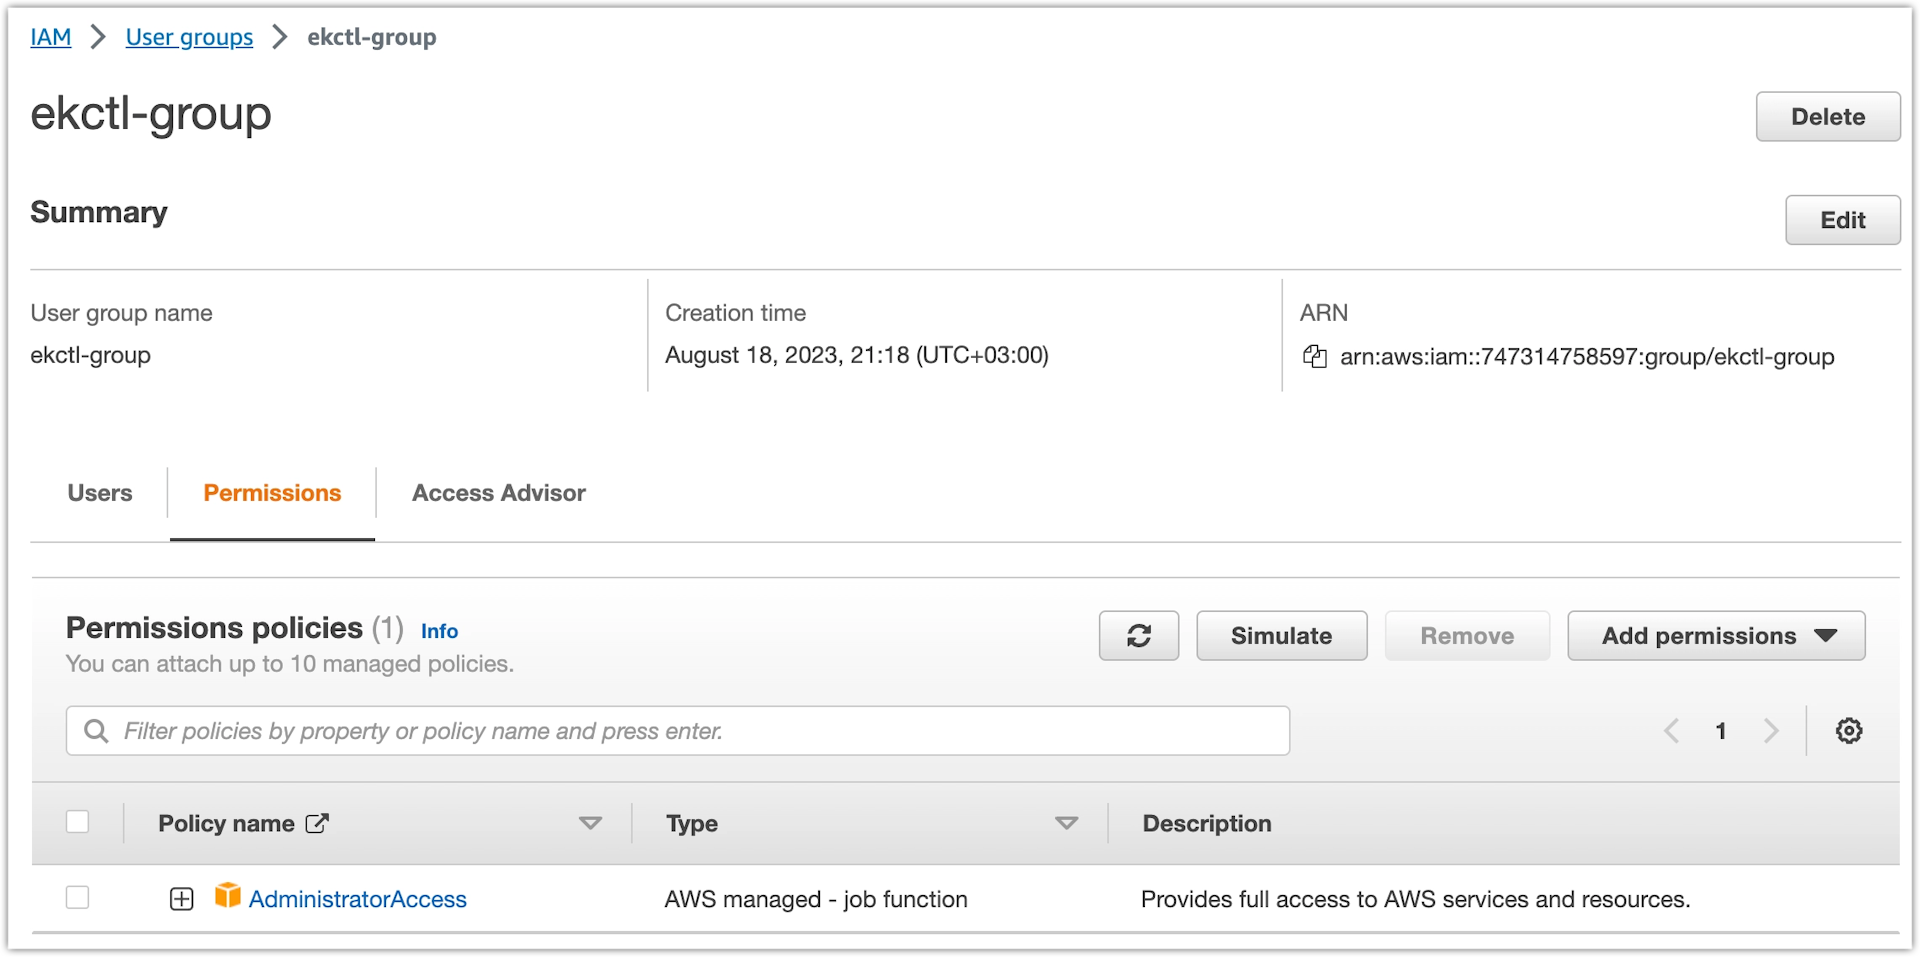
Result
The required AdministratorAccess policy is now added to the user group eksctl-group.
Task 4: Create a user
Create a non-ROOT user that should be part of the new user group and will have permissions to run the MOSTLY AI deployment script.
Steps
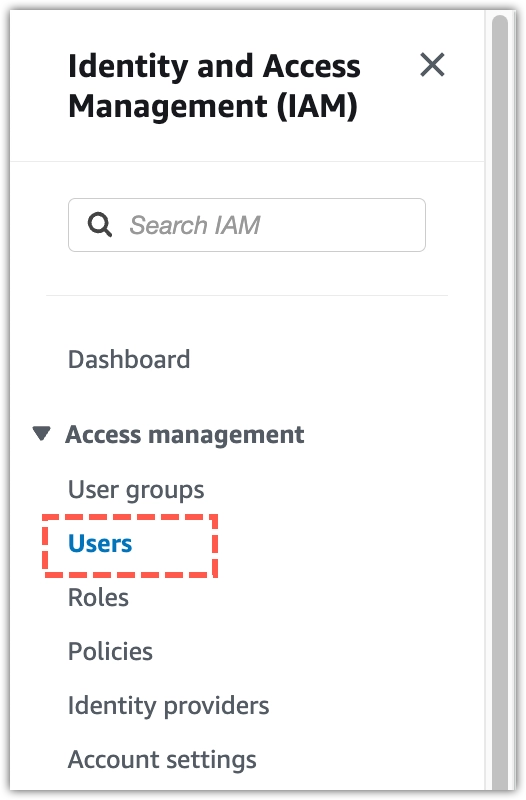
- Open Identity and Access Management (IAM).
- Select Users from the sidebar.
- Click Create user.

- Name the user
eksctland click Next.
- On the Set permissions step, select the
eksctl-groupand click Next.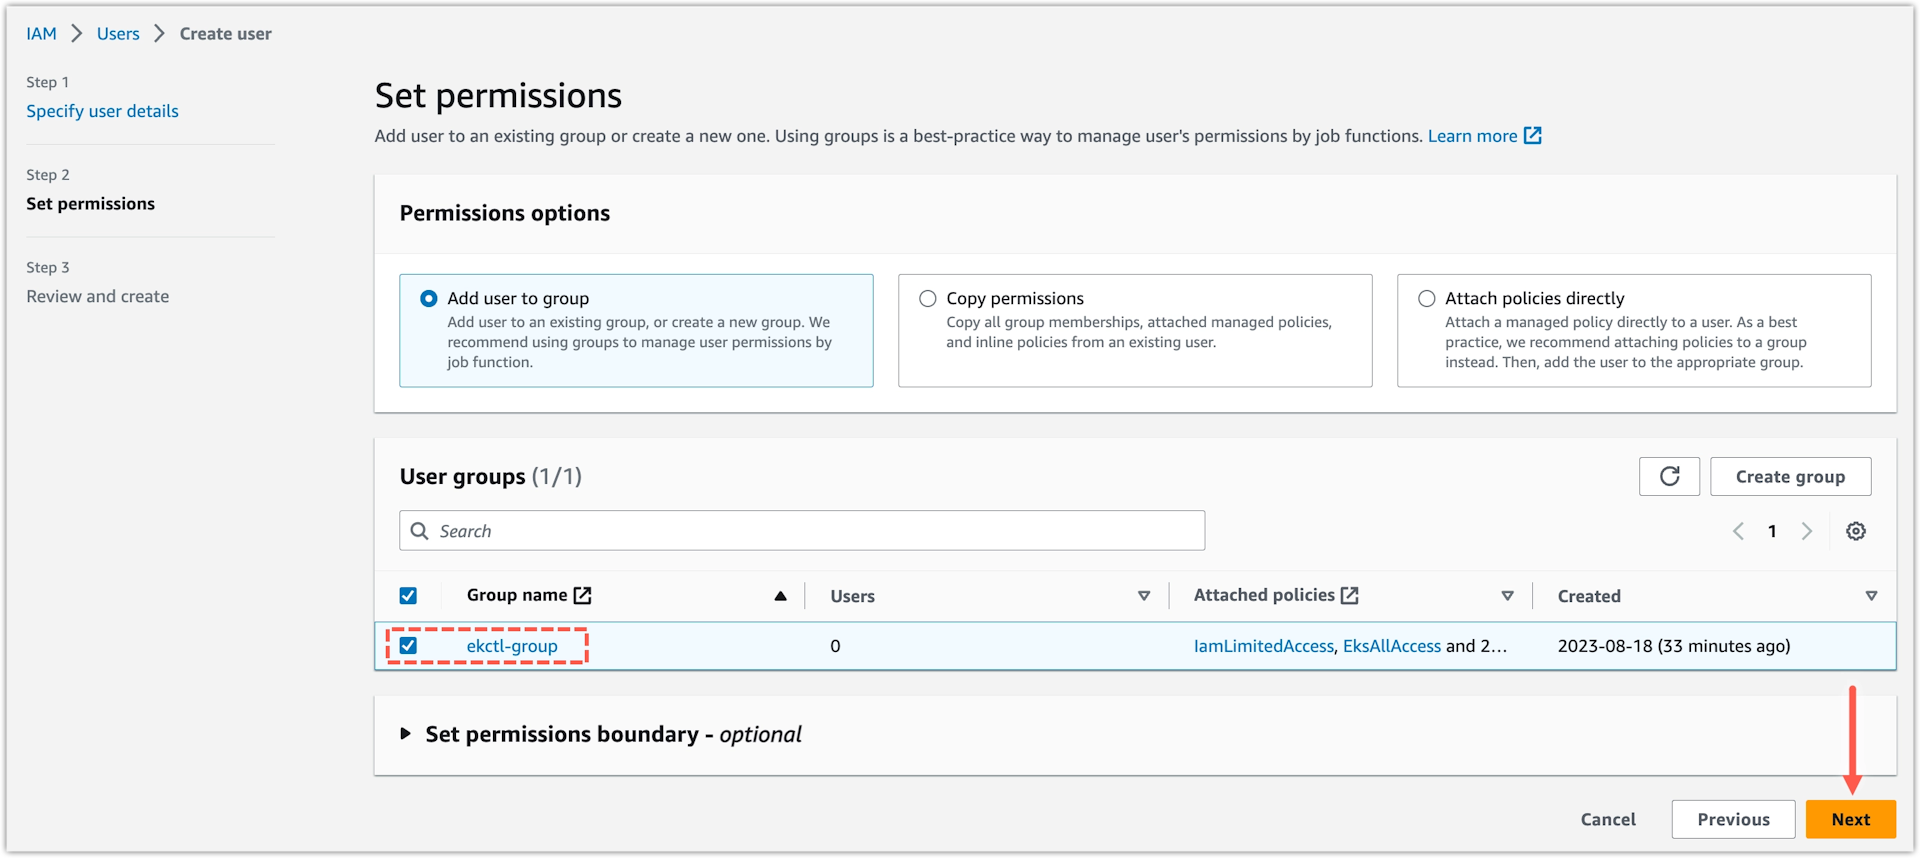
- On the Review and create step, click Create user.
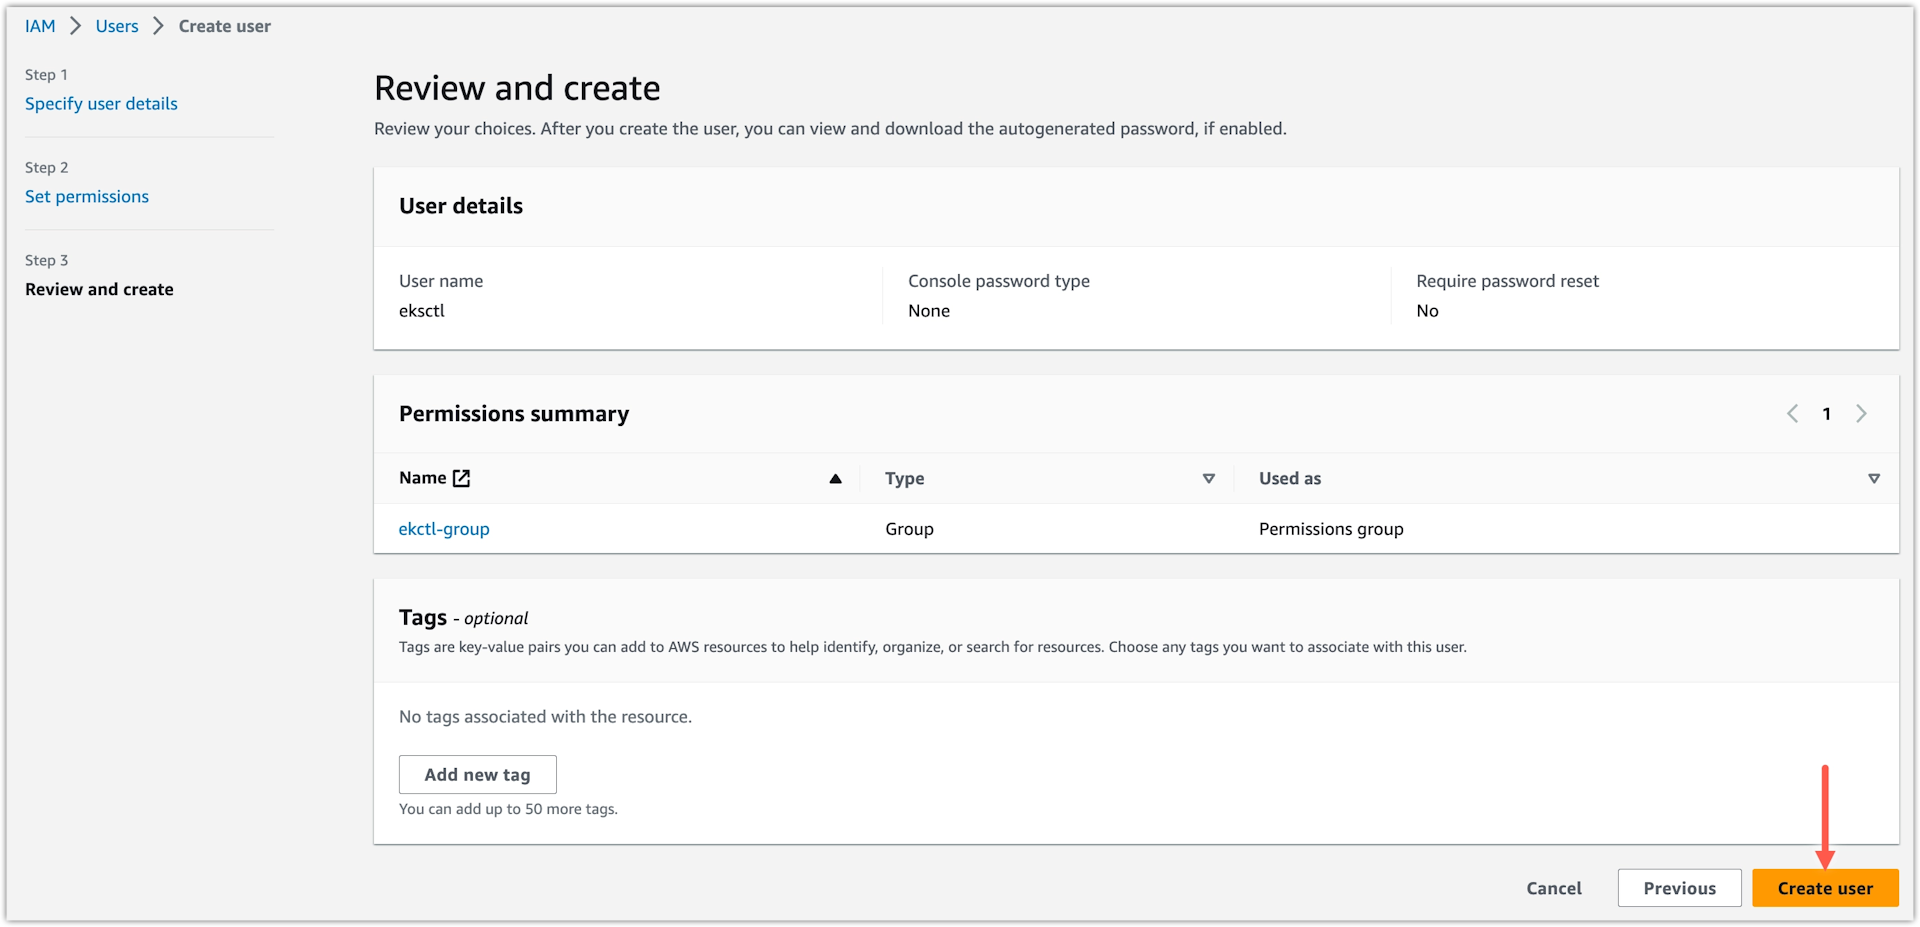
Result
The user is now created and appears in the Users table.

Task 5: Create an access key for the user
Create an access key for the created user. You use the access key to configure and use the AWS CLI and run automated commands or scripts.
Step
- In IAM > Users, select the
eksctluser. - Click Create access key.

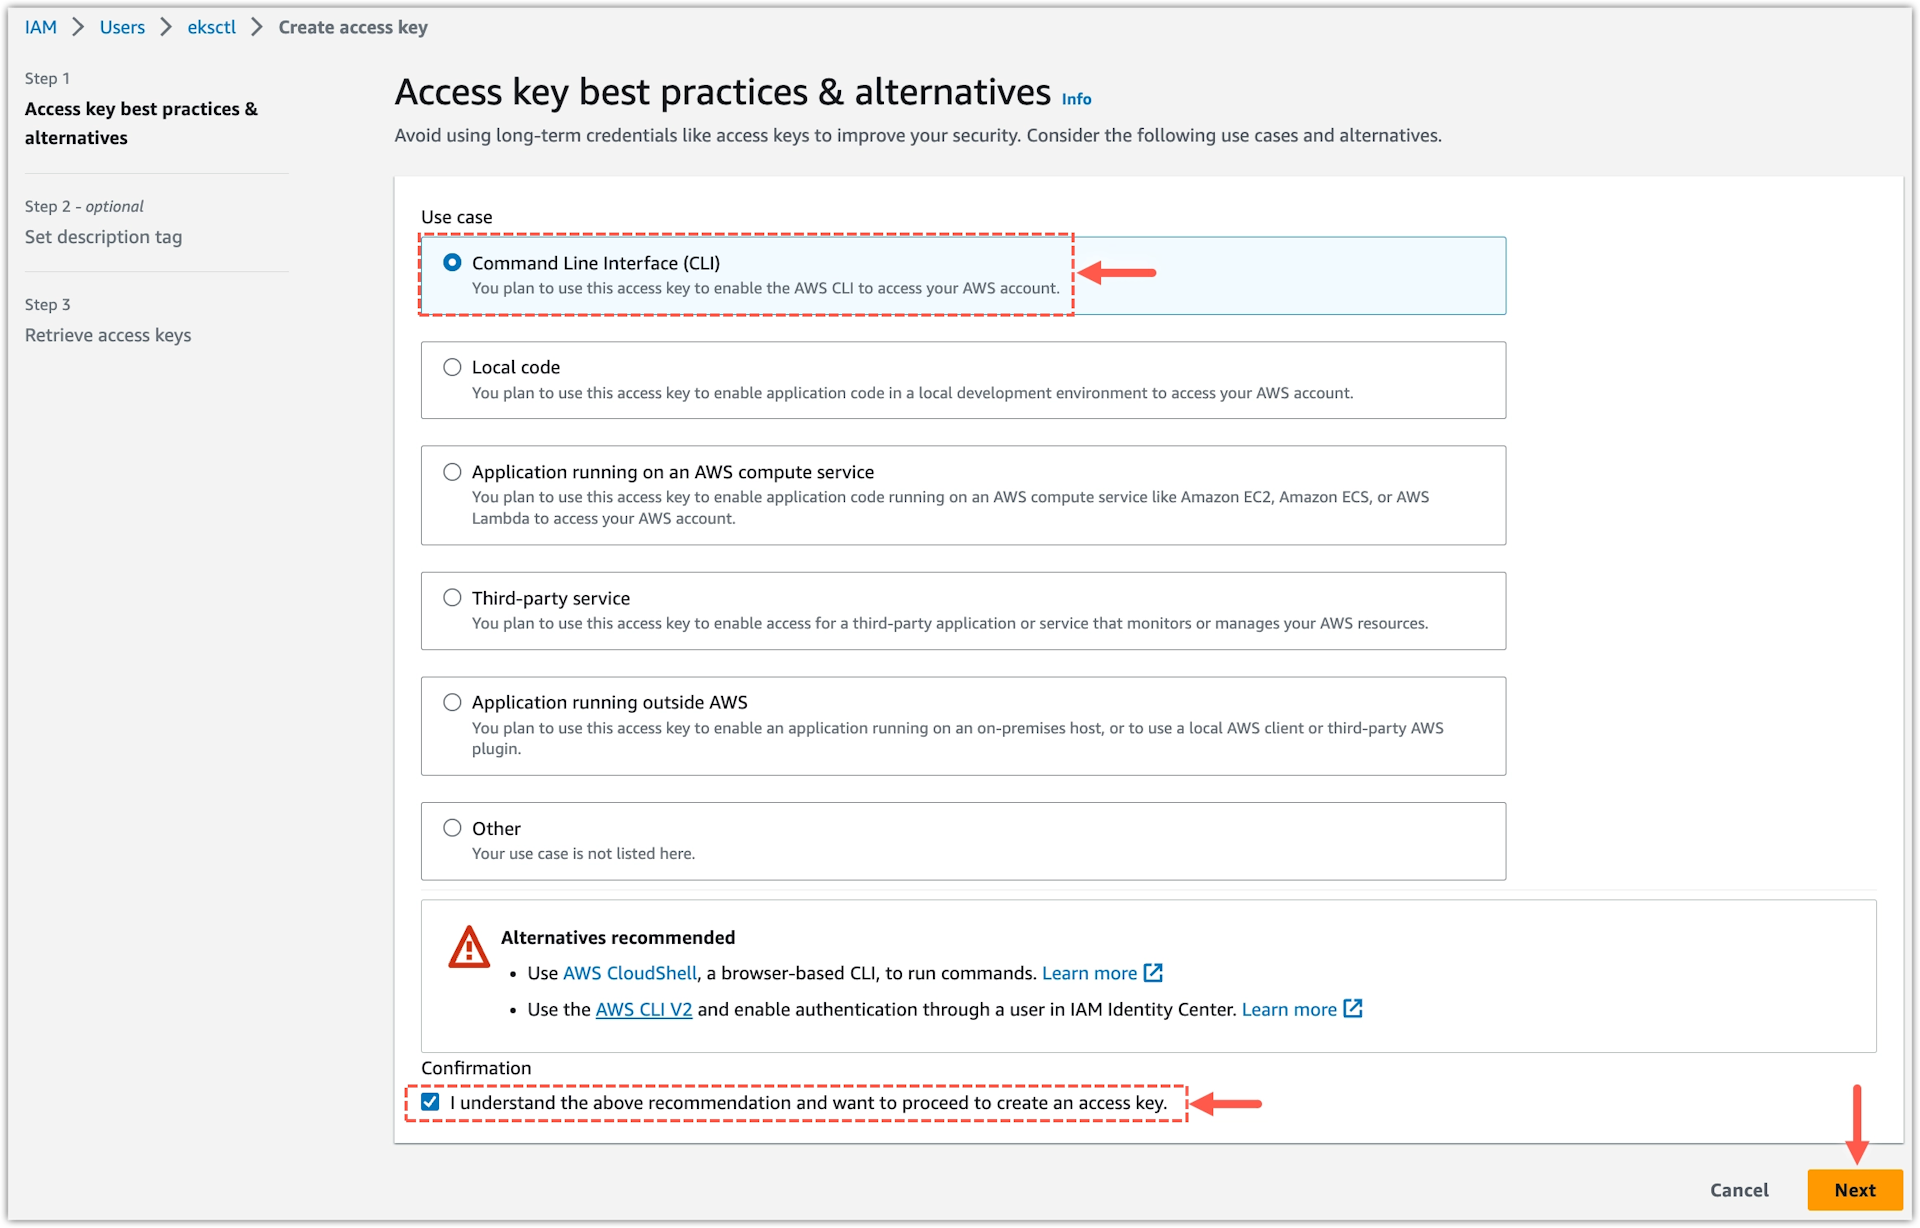
- Select Comand Line Interface.
- Select the I understand the above recommendation… checkbox.
- Click Next.
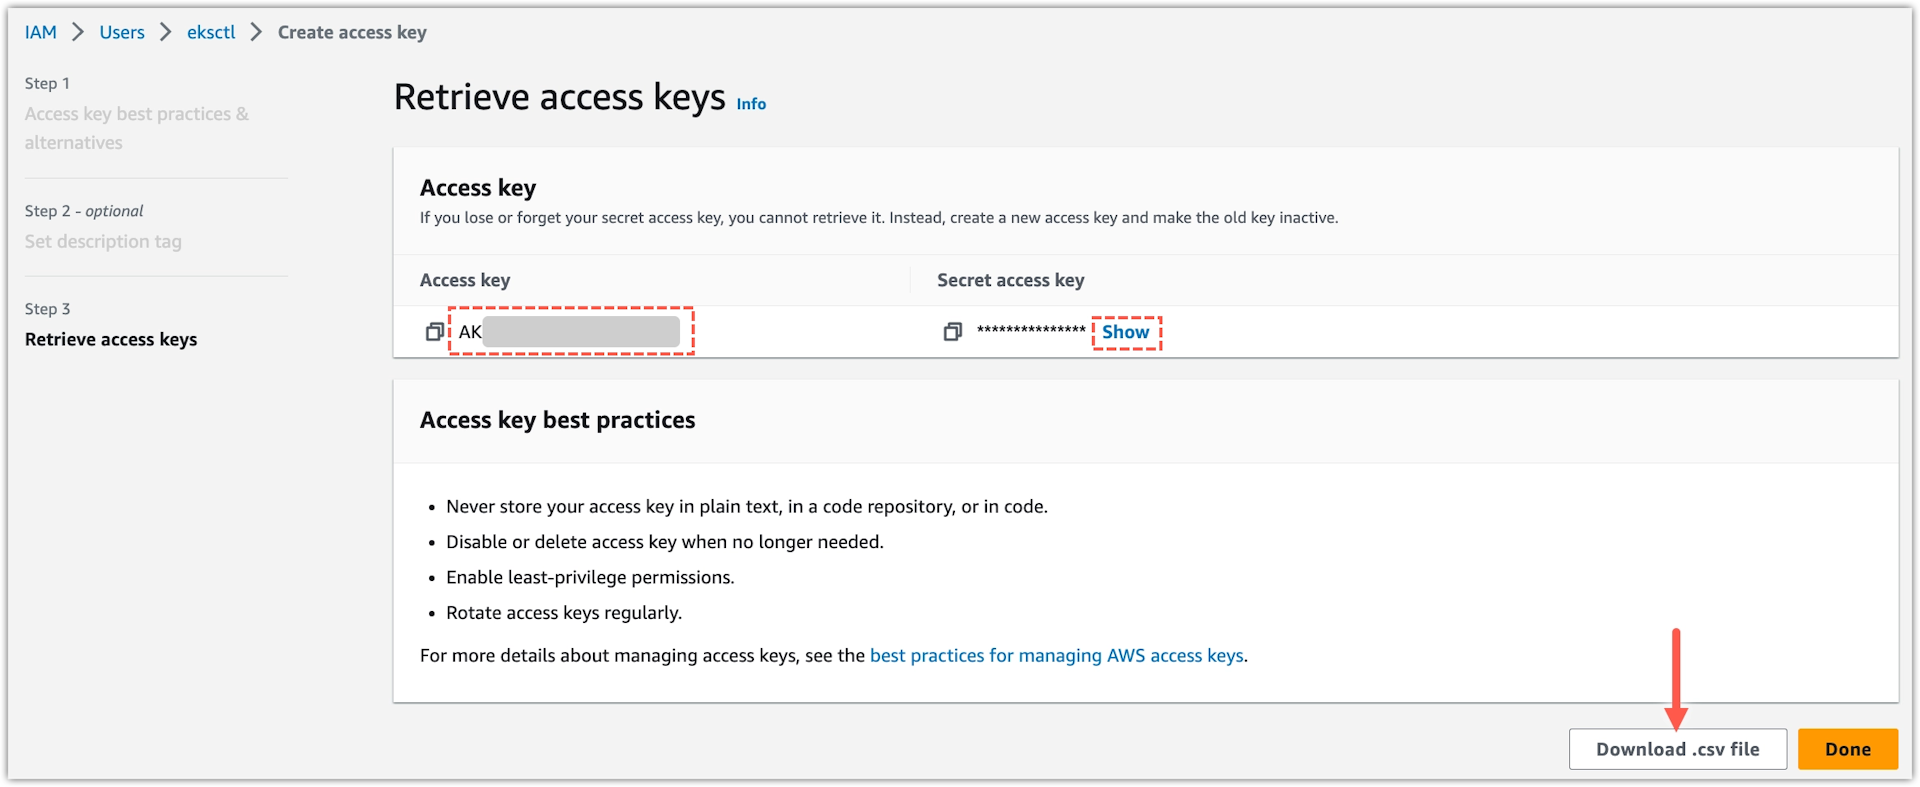
- Click Create access key.

- (Optional) View the Access key and Secret access key values.
- Click Download .csv file to download the access key locally.
Result
The file eksctl_accessKeys.csv is saved locally and contains the Access key and Secret access key values.
Task 6: Configure AWS CLI
With the user created specifically for the creation and deployment of MOSTLY AI, you can use it configure AWS CLI so that the user performs all scripted tasks.
Prerequisites
- AWS CLI. See Install or update the latest version of the AWS CLI in the AWS Documentation.
- Prepare your Access key and Secret access key from the previous task.
Steps
- Open a command-line application.
- Create an AWS CLI named profile for the
eksctluser with theaws configurecommand.aws configure --profile eksctl - Complete the prompts for the
aws configurecommand.- For
AWS Access Key ID [None], paste your access key. - For
AWS Secret Access Key [None], paste your secret access key. - For
Default region name [None], type the default AWS region you want to use. For example,eu-central-1. - For
Default output format [None], typejson.
- For
Result
You AWS CLI profile for the eksctl user is now created.
You can verify the configuration from your home folder. If you did not have a previously configured profile, the following commands should produce results similar to the ones below.
- View the contents of
.aws/configin your home folder to see the configured profiles.Without any previously configured profiles, the result should be similar to the following:cat ~/.aws/config[profile eksctl] region = eu-central-1 output = json - View the contents of
.aws/credentialsin your home folder to see the saved access key and secret access key for the profile.Without any previously configured profiles, the result should be similar to the following (actual secret values are obfuscated with asterisks):cat ~/.aws/credentials[eksctl] aws_access_key_id = AK****************** aws_secret_access_key = ****************** - Finally, you can use the
aws sts-caller-identitycommand to check if the previous configurations were correct:The result should be similar to the following (actual secret values are obfuscated with asterisks):aws sts get-caller-identity --profile eksctl{ "UserId": "AI*******************", "Account": "74**********", "Arn": "arn:aws:iam::74**********:user/eksctl" }
Task 7: Create a hosted zone in Route 53
You need to have a fully-qualified domain name (FQDN) for your MOSTLY AI application. If you need to register a new FQDN, you can do so from any domain name registrar (such as GoDaddy, Namecheap, or any other) or use AWS Route 53. You can also use a subdomain.
If you register an FQDN with Route 53, you already have your hosted zone available in AWS under Route 53 > Hosted zones.
If you register an FQDN from another domain registrar, you need to create a hosted zone in Route 53 with your registered domain. In this case, follow the steps below.
Steps
-
From AWS Services, search and open Route 53.

-
Select Hosted zones from the sidebar.
-
Click Create hosted zone.

-
For Domain name, type your FQDN.
-
Click Create hosted zone.
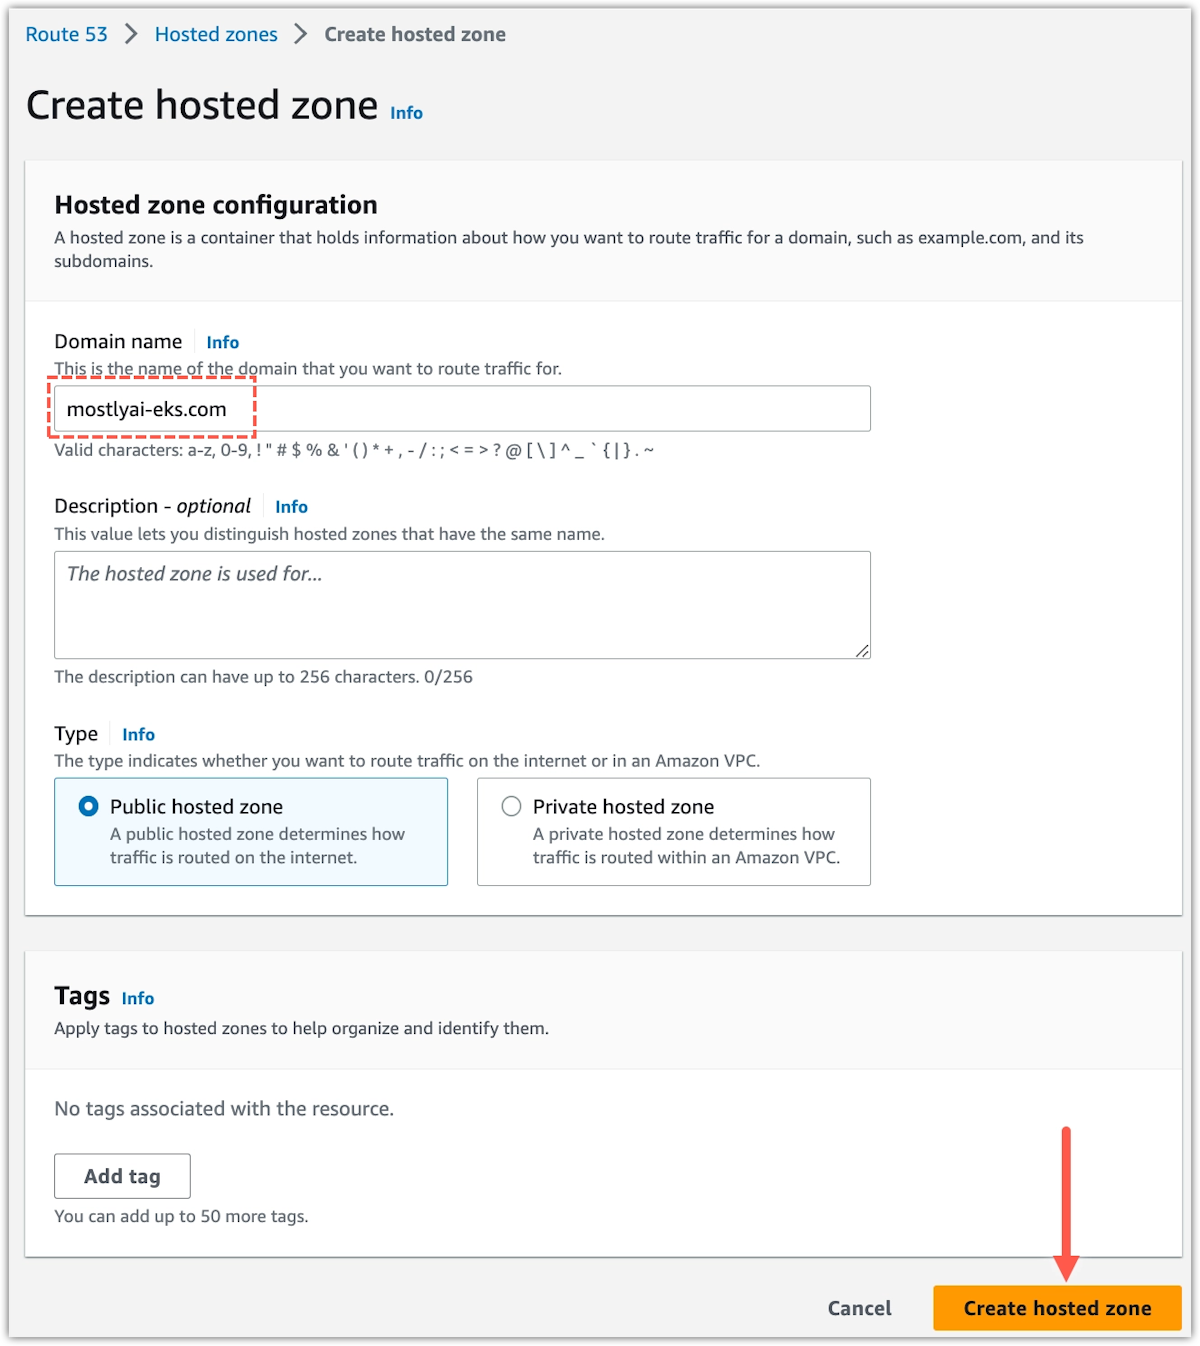
Step result: Your FQDN appears in the Records tabe.
-
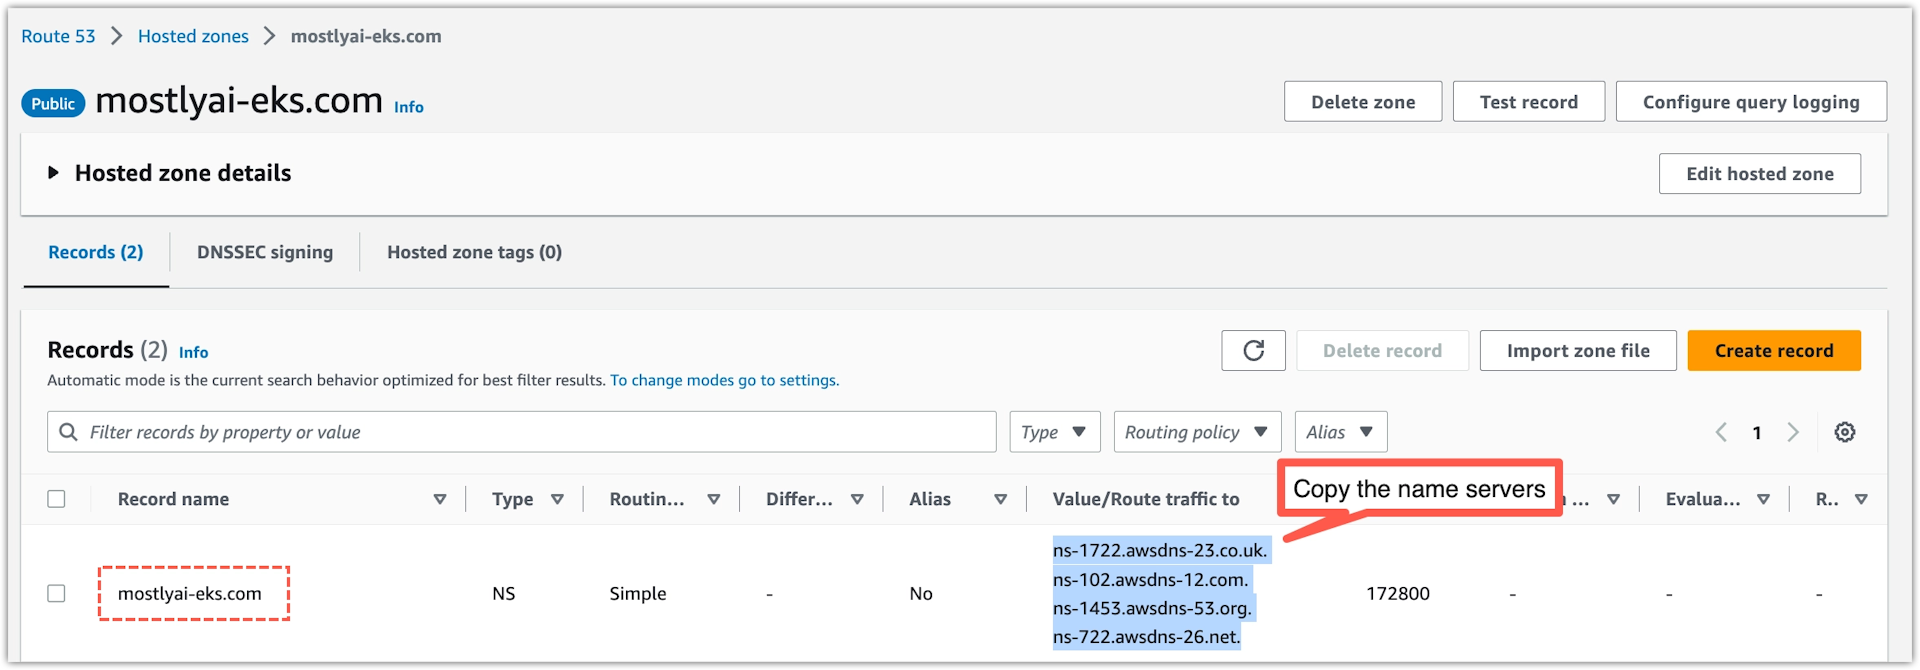
From the Records table, copy the name servers for the hosted zone you created.
-
Go to your domain registrar and add the copied name servers as custom nameservers for your domain.
The propagation of the updated name servers across the DNS network might take several hours.
For more information, contact your domain registrar.
Result
You now have a configured hosted zone in Route 53 for your FQDN.
Depending on your domain name provider, it might take some time (sometimes up to a few days) before the new nameservers are updated and propagated across the global DNS network.
Task 8: Create a SSL certificate for your FQDN
To enable encrypted access with your FQDN, you need an SSL certificate. You can create a SSL certificate through AWS Certificate Manager.
An SSL certificate for your FQDN is required to deploy MOSTLY AI in an EKS cluster.
Steps
-
From AWS Services, search and open Certificate Manager.

-
Click List certificates from the sidebar.
-
Click Request.

-
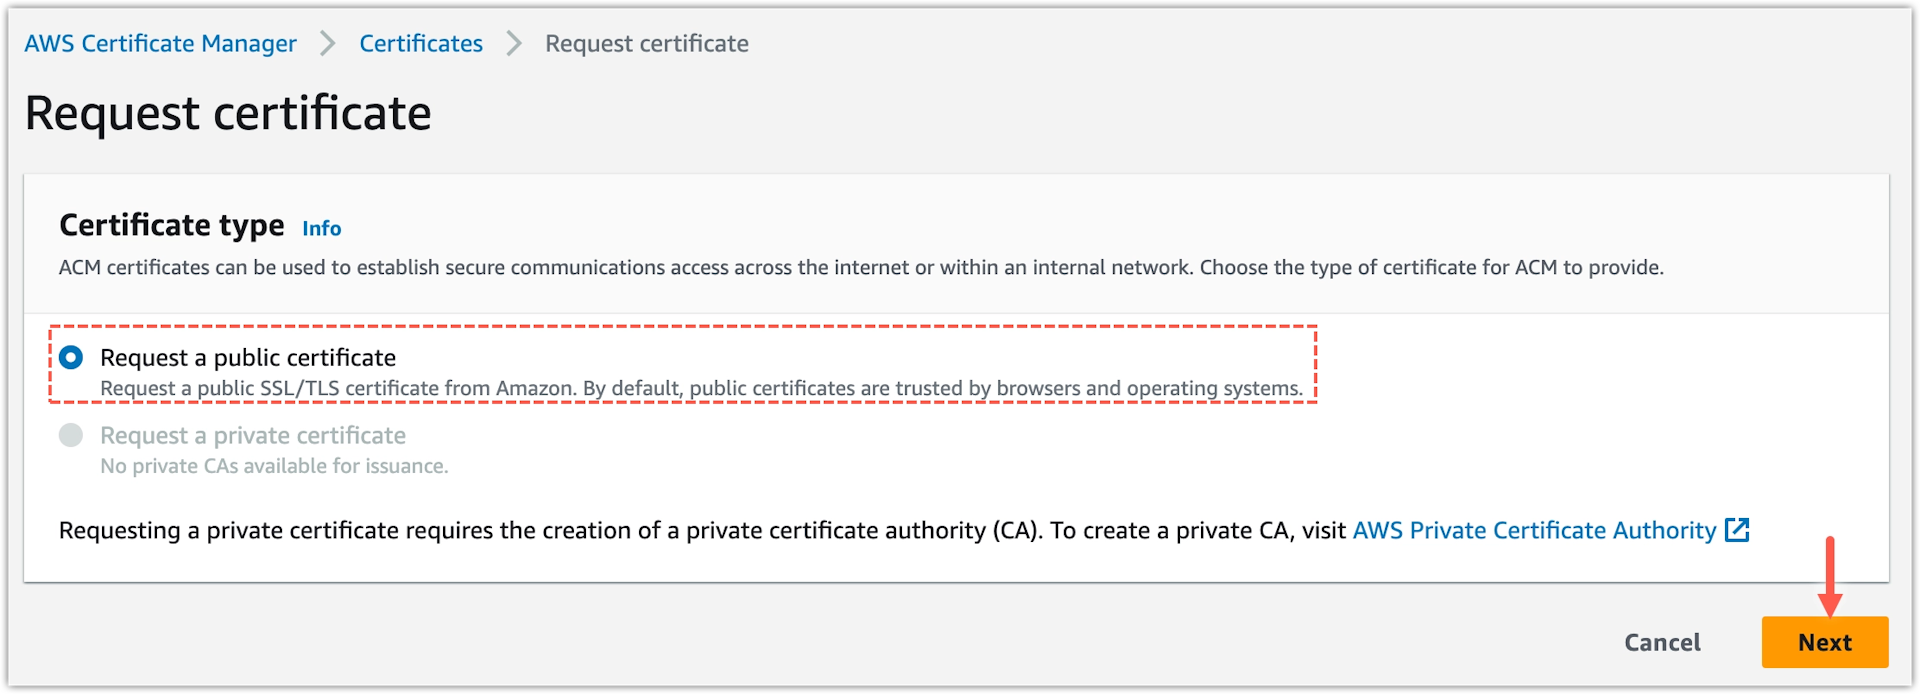
Select Request a public certificate and click Next.
-
Configure and submit a certificate request.
- For Fully qualified domain name, type your FQDN.
- Select DNS validation under Validation method.
- Click Requst.
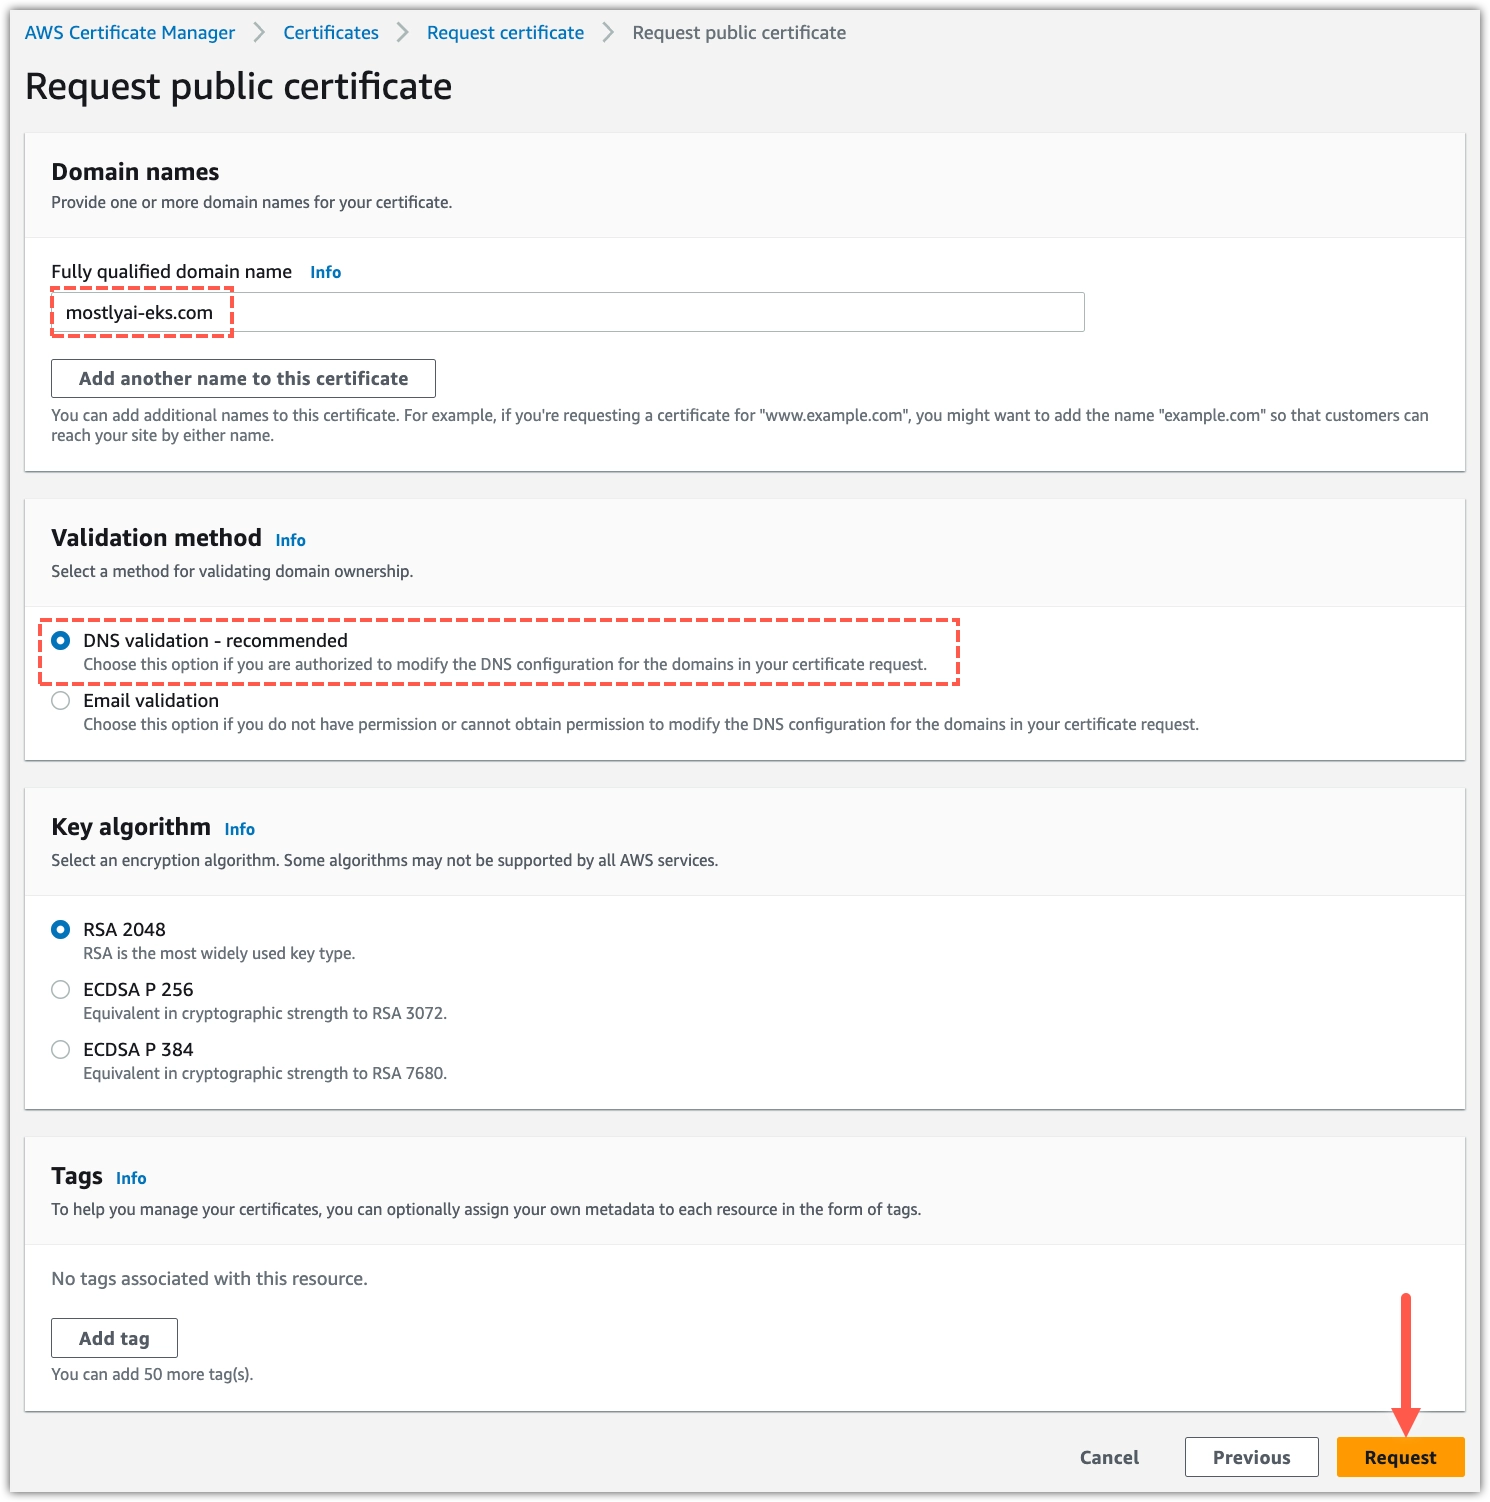
Step result: A notification indicates that the certificate requires further validation.

-
Validate you are the owner of your domain.
💡AWS provides two validation methods: DNS validation and Email validation.
For more information, see Validating domain ownership in the AWS Certificate Manager (ACM) documentation.
The steps below demonstrate the DNS validation method when your domain name provider is not AWS Route 53.
If your domain name provider is AWS Route 53, see DNS validation in the AWS Certificate Manager (ACM) documentation.
- Select List certificates.
- Select the Certificate ID in a Pending validation status.

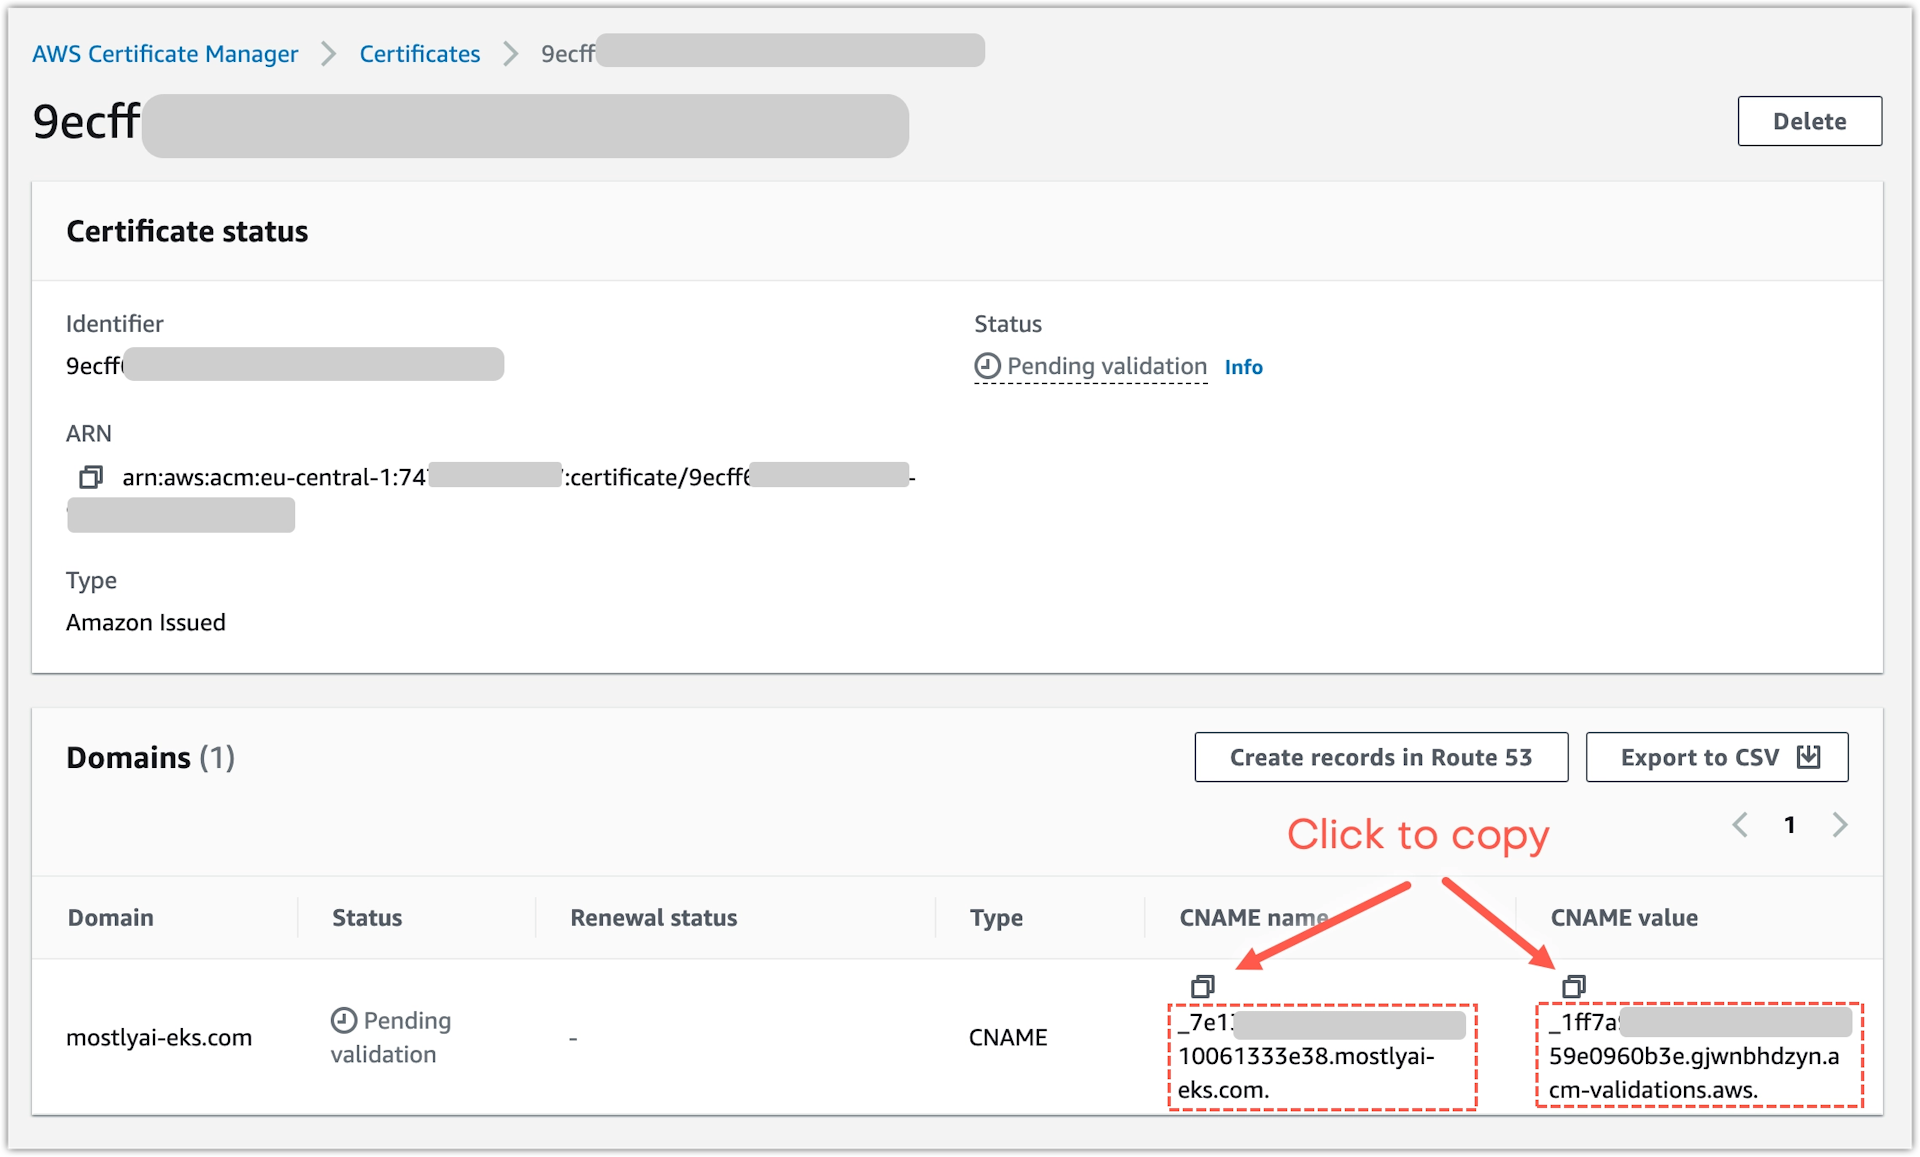
- Copy the CNAME name and value and add them as a new CNAME record in your DNS provider.
- Create a new CNAME record for your domain name in your domain name provider web interface.
⚠️
See your domain name provider documentation on how to add a new CNAME record for the DNS validation.
Result
As explained the DNS validation page in the AWS ACM Documentation, the DNS validation can take up to 30 minutes after you add the CNAME record in your domain name provider web interface.
After the DNS validation completes, the Status of your certificate changes to Issued in the certificates list.

Task 9: Create an AWS EKS cluster
To simplify the creation of an EKS cluster, you can use the eksctl command-line tool. The tool creates the cluster and the required resources in CloudFormation.
Prerequisites
Install eksctl.
Steps
-
Create a CloudFormation YAML file named
mostly-ai-cluster.yamlwith the contents below.mostly-ai-cluster.yamlapiVersion: eksctl.io/v1alpha5 kind: ClusterConfig metadata: name: mostly-ai region: eu-central-1 nodeGroups: - name: mostly-ai-nodegroup instanceType: m5.8xlarge desiredCapacity: 1 cloudWatch: clusterLogging: enableTypes: ["audit", "authenticator", "controllerManager"] addons: - name: aws-ebs-csi-driver version: latest attachPolicyARNs: - arn:aws:iam::aws:policy/service-role/AmazonEBSCSIDriverPolicy -
Run the CloudFormation definition with your AWS CLI.
shelleksctl create cluster -f mostly-ai-cluster.yaml
Result
The cluster creation is started in CloudFormation.
What’s next
You can track the cluster creation in CloudFormation. When the cluster is created, you can proceed to grant access to your AWS user to view resources in the cluster.
Task 10: Grant permissions to view cluster resources
With your cluster ready, you can view it in the AWS Management Console under Elastic Kubernetes Service > Clusters. However, when you open the Resources tabs or browse To do so, you need to grant permissions to the user that created the cluster.
Add the the AmazonEKSAdminPolicy and AmazonEKSClusterAdminPolicy policies to the user creating the cluster. The policies are required so that the user that you create the cluster with can view and manage nodes and resources in the EKS cluster.
Steps
- In AWS, open Elastic Kubernetes Service (EKS).
- From the sidebar, select Clusters.
- Select the mostly-ai-cluster.
- From the cluster tabs, select Access.
- View the entries under IAM access entries.
- Select the user to which you need to grant permissions.

- Click Add access policy.

- Add the AmazonEKSAdminPolicy and AmazonEKSClusterAdminPolicy policies. Repeat the steps below for each.
- For Policy name, select one of the policies.
- For Access scope, select Cluster.
- Click Add access policy in the bottom right.

Result
The access policies now appear for the user.
The user can now view the available nodes on the Compute tab and view the pods on Resources tab, under Workloads > Pods.
Task 11: Grant permissions to provision storage volumes
The shared storage service minio that is provisioned during the deployment requires permissions to create storage volumes. To grant the required permissions, you need to attach the AmazonEC2FullAccess policy to the eksctl-mostly-ai-cluster-nodegroup-NodeInstanceRole-****** role.
Steps
- In AWS, open Identity and Access Management (IAM).
- From the sidebar, select Roles.
- Search for
nodeinstanceand open theeksctl-mostly-ai-cluster-nodegroup-NodeInstanceRole-******role.
- Click Add permissions and select Attach policies.

- Search for
ec2fullaccess, select AmazonEC2FullAccess and click Add permissions.
Result
The eksctl-mostly-ai-cluster-nodegroup-NodeInstanceRole-****** role now has the AmazonEC2FullAccess policy attached. With the policy, the role can provision storage volumes as required by the minio shared storage service.
Task 12: Configure an ingress controller
MOSTLY AI supports HAProxy by default as the ingress controller. NGINX and Istio virtual services are also supported.
For details on how to configure each, see Ingress controllers.
Deployment
Task 13: Edit the values.yaml file
Prerequisites
Obtain the MOSTLY AI Helm chart from your Customer Experience Engineer. The Helm chart includes the values.yaml file.
Steps
- In a terminal or command prompt, make the Helm chart directory the current directory .
shell
cd <helm-chart-directory> - Edit the
values.yamlfile. - At the start, set the application domain name to an FQDN. Do the same as listed below for
minio.values.yaml_customerInstallation: domainNames: mostly-ai: &fqdn yourfqdn.com - Apply one of the configurations below depending on whether you intend to use TLS-encrypted access to the MOSTLY AI application.
➡️ You use a TLS certificate. Replaceyour-tls-secretwith the TLS secret name as defined in your cluster configuration.💡Your IT department or Kubernetes administrator creates the FQDN and its TLS certificate and adds it to the configuration of your cluster. When added, it comes with a TLS secret name that you can define in the
values.yamlfile. For details, see Configure your domain TLS certificate.➡️ You do not use a TLS certificate. Replace thevalues.yaml_customerInstallation: ... deploymentSettings: tlsSecretName: &tlsSecretName your-tls-secret ... global: ... tls: enabled: true ...your-tls-secretwith an empty string and, forglobal.tls, setenabledtofalse.values.yaml_customerInstallation: ... deploymentSettings: tlsSecretName: &tlsSecretName [] # your-tls-secret ... global: ... tls: enabled: false ... - (Optional) If you host third-party container images in an internal repository, replace
docker.ioinregistryFor3rdPartyComponents.values.yaml_customerInstallation: ... deploymentSettings: ... registryFor3rdPartyComponents: ®istryFor3rdPartyComponents REPLACE_WITH_INTERNAL_IMAGE_REPOSITORY ... - (Optional) If you need to host MOSTLY AI container images in an internal repository, replace
quay.io/mostlyaiinmostlyRegistry.values.yaml_customerInstallation: ... deploymentSettings: ... mostlyRegistry: &mostlyRegistry quay.io/mostlyai ... - (Optional) If you intend to use the MOSTLY AI image repository at
quay.io/mostlyai, set its secret inmostlyRegistryDockerConfigJson.💡To obtain the secret, contact your MOSTLY AI Customer Experience Engineer.
values.yaml_customerInstallation: ... deploymentSettings: ... mostlyRegistryDockerConfigJson: &mostlyRegistryDockerConfigJson INSERT_QUAY.IO_SECRET ... - Set an AWS storage class in
_customerInstallation.deploymentSettings.persistenceStorageClass. For example, setgp2for the default AWS storage class.values.yaml_customerInstallation: ... deploymentSettings: ... persistenceStorageClass: &persistenceStorageClass gp2 ...
Result
The values.yaml file is now configured for your deployment.
Task 14: Deploy MOSTLY AI
- Deploy the MOSTLY AI Helm chart.
The result from the command should be similar to the following. If you see errors, see the Troubleshoot AWS EKS deployment issues section.shell
helm upgrade --install mostly-ai ./mostly-combined --values values.yaml --namespace mostly-ai --create-namespaceRelease "mostly-ai" does not exist. Installing it now. NAME: mostly-ai LAST DEPLOYED: Fri Nov 10 18:45:58 2023 NAMESPACE: mostly-ai STATUS: deployed REVISION: 1 TEST SUITE: None
Post-deployment
Task 15: Set your FQDN to point at your ALB
If the deployment script finishes successfully in Task 11, you now need to configure your FQDN to point to the ALB that is created by the CloudFormation script at the address that is output by the script.
Steps
- Go to Route 53 > Hosted zones and select the hosted zone for your FQDN.
- Click Create record.
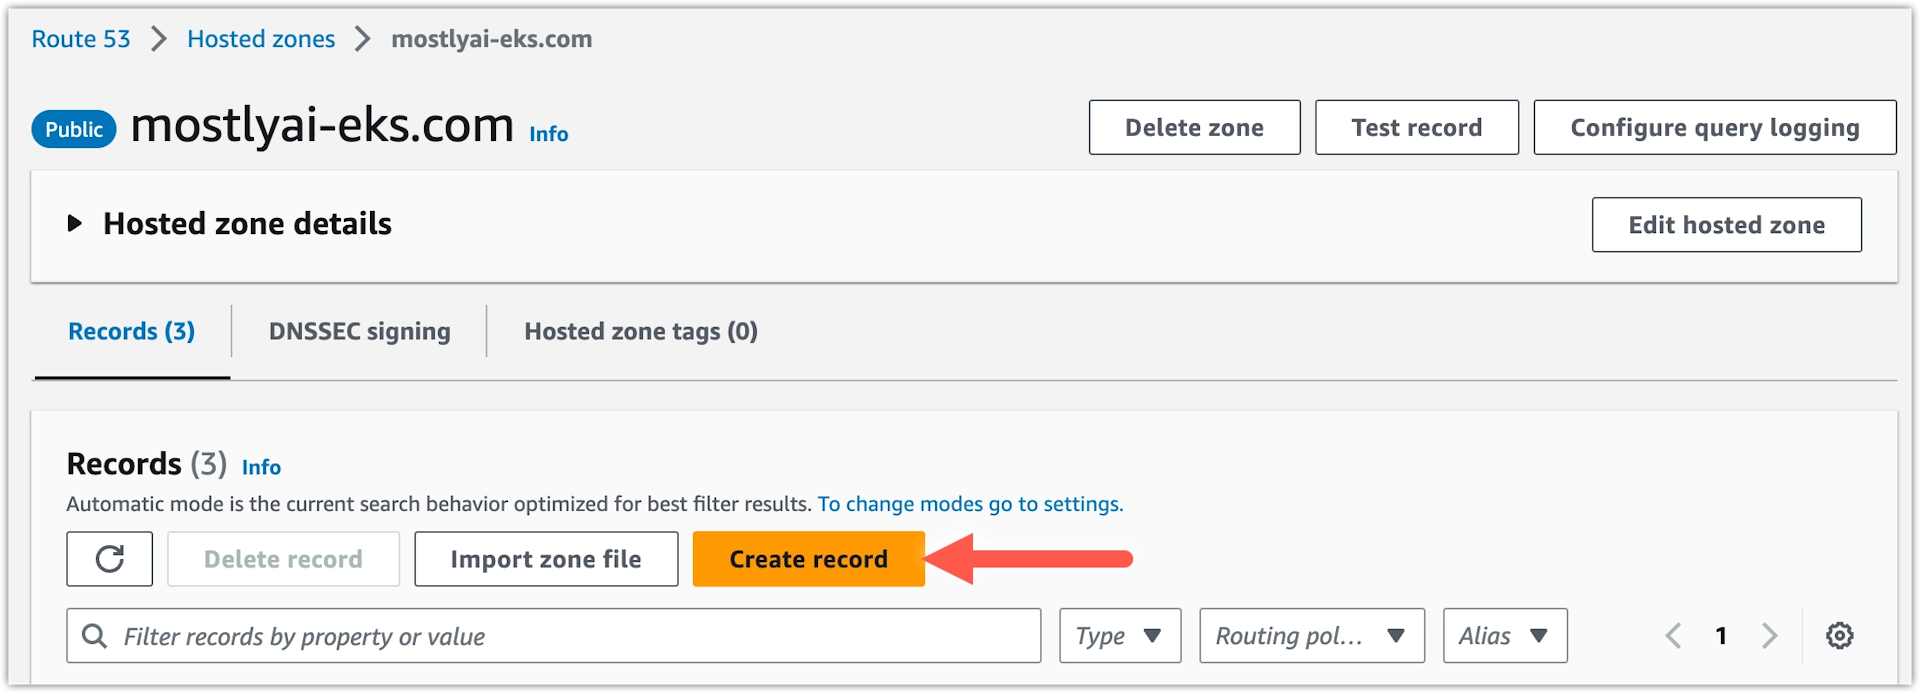
- Configure the record.
- For Record type, select A - Route traffic to an IPv4 address and some AWS resources.
- For Alias, enable the checkbox.
- Under Route traffic to, select the following options:
- Alias to an Application and Classic Load Balancer
- Select your region. In this case, Europe (Frankfurt).
- From the search box, select the name of your ALB.
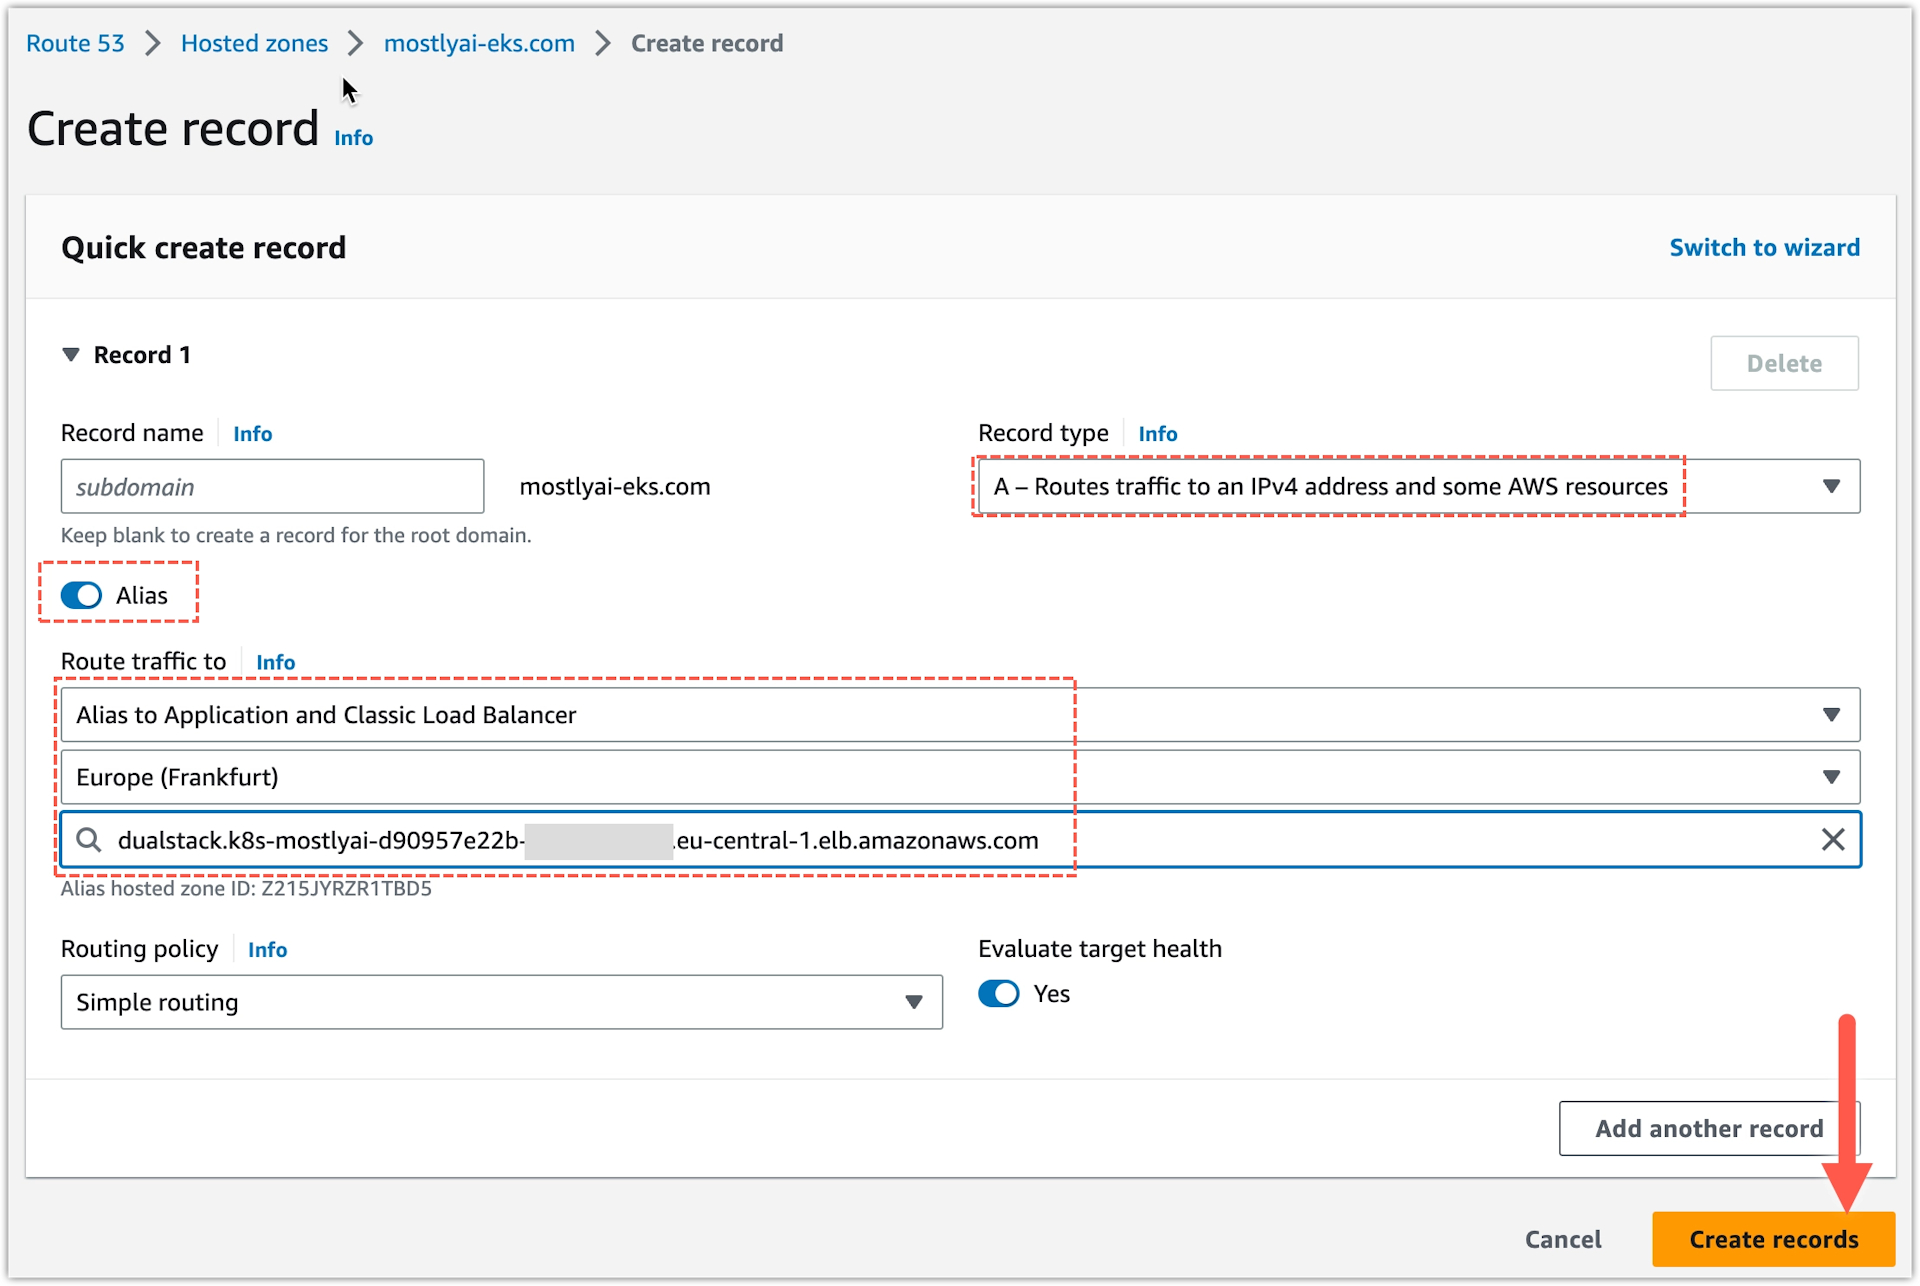
- Click Create records.
Result
Your FQDN now points to the ALB for the MOSTLY AI app.
What’s next
You can now direct your browser to your FQDN and open your deployed MOSTLY AI app for the first time.
Task 16: Log in to your MOSTLY AI deployment
Log in for the first time to your MOSTLY AI deployment to set a new password for the superadmin user.
Prerequisites
Obtain the superadmin credentials from your Customer Experience Engineer.
Steps
- Open your FQDN in your browser.
Step result: You Sign in page for your MOSTLY AI deployment opens.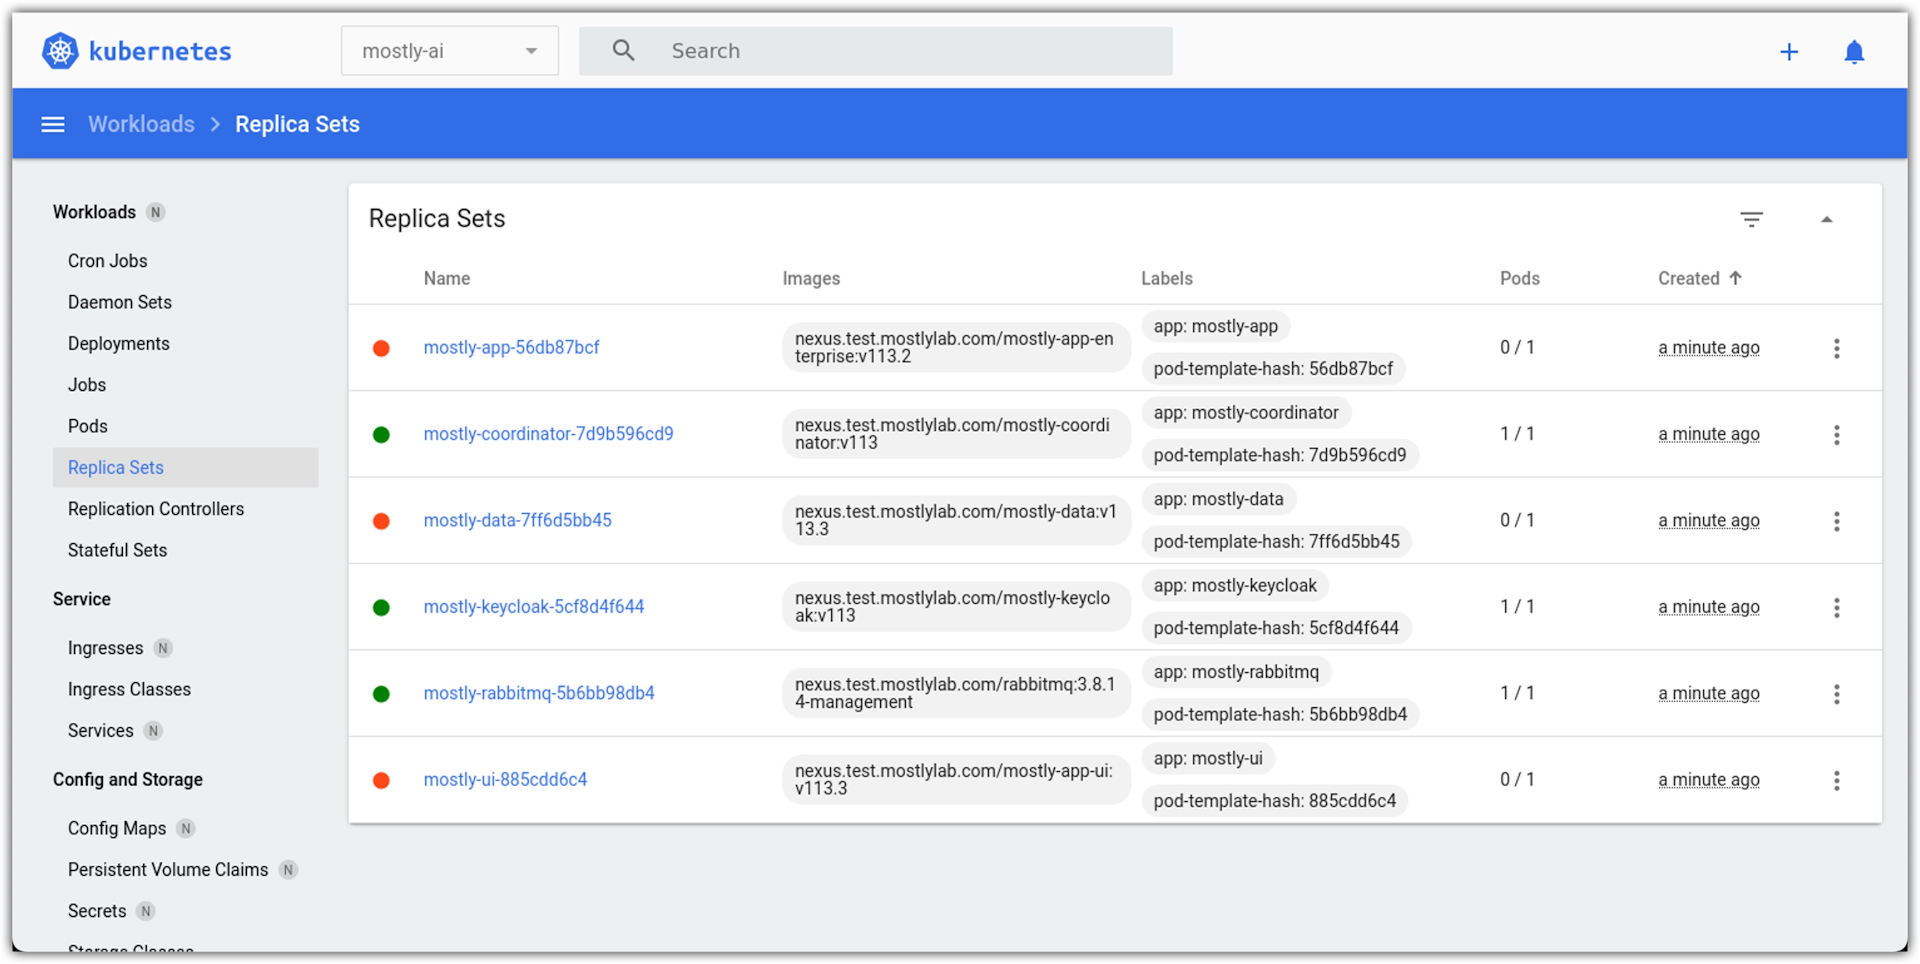
- Enter the superadmin credentials and click Sign in.
- Provide a new password and click Change password.
Result
Your superadmin password is now changed and you can use it to log in again to your MOSTLY AI deployment.